Bubbles & Conversations in Android 11: Getting Started
Learn how to use Bubbles in Android to add notifications and create conversational shortcuts for Direct Share. By Jenn Bailey.
Dynamically Updating the Shortcuts
Now that the code to create the shortcuts is in place, it’s time to add the ability to update them dynamically. Add the code below to updateShortcuts:
var shortcuts = createShortcuts()
// 1
if (importantCategory != null) {
  shortcuts = shortcuts.sortedByDescending { it.id == importantCategory.shortcutId }
}
// 2
val maxCount = shortcutManager.maxShortcutCountPerActivity
if (shortcuts.size > maxCount) {
  shortcuts = shortcuts.take(maxCount)
}
// 3
shortcutManager.addDynamicShortcuts(shortcuts)
updateShortcuts dynamically arranges the shortcuts, making sure the number doesn’t exceed the maximum allowed. Here’s what’s going on in the code:
- If there’s an important category, move it to the top of the list of shortcuts for easy access.
- The platform limits the number of shortcuts that can display in the list, so you need to truncate the list if the categories don’t all fit.
- Use a call to
addDynamicShortcutsto add the shortcuts.
When the app starts and it sets up the notification channels, it uses updateShortcuts to create the shortcuts. Each time the app shows a notification, it updates the shortcuts to keep the most frequently accessed conversations at the top of the shortcuts list.
Testing the Shortcuts
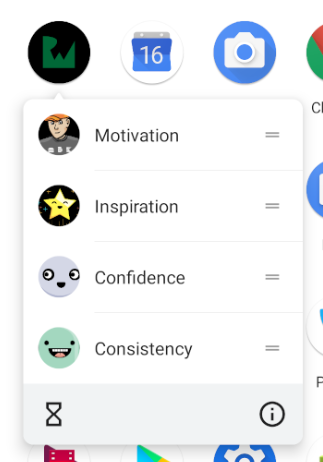
Build and run, then press the Home button and find the app icon. Long-press the app icon to see the shortcuts:
Pick a shortcut to open that category in the app and launch a notification, then pull down the shade to see it:

The notification now displays in the Conversations section. Long-press the notification:

Set the conversation to have priority. The first time the user does this, the system confirms that the conversation is now a priority. Setting the conversation to have priority has the following effects:
- It adds an orange circle around the avatar.
- The conversation now appears at the top of the Conversations section.
- The avatar displays on the lock screen.
- The user can set their do not disturb settings to let priority conversations through.
Now, you’ll add a component that lets the shortcuts appear in Direct Share.
Allowing Direct Sharing Through Shortcuts
Conversational shortcuts make it easy to share conversations through Direct Share. In Android 11, you can pin up to four apps to the default share menu. Otherwise, apps and conversations appear in the menu, organized contextually.
To add the shortcuts to Direct Share, open AndroidManifest.xml and add the following code inside the activity tag for MainActivity:
<intent-filter>
  <action android:name="android.intent.action.SEND" />
  <category android:name="android.intent.category.DEFAULT" />
    <data android:mimeType="text/plain" />
  </intent-filter>
Build and run. Now, you can either close the app or leave it open in the background while you open your favorite web browser and search for a quote. Highlight the quote and tap Share:

You’ll see the Direct Share menu with the app and conversation shortcuts listed:

You can select any of the conversation shortcuts to save the quote under that category in the app. Alternatively, you can also select the app itself and then select a category:

The user can now directly share to the app via the conversation shortcuts with Direct Share. Great job!
Notification Bubbles
When working with bubbles, the user has the option to disallow them for certain apps or conversations, so it’s always a good idea to provide a notification with sufficient information for the bubble. Because you’ve done that in this app, now you can add the extra information called BubbleMetadata.
Adding BubbleMetadata
In NotificationHelper, add:
private fun createPendingQuoteBubbleIntent(category: Category):
  PendingIntent {
    val contentUri = (
      "https://raywenderlich.android.bubblesaffirmations.com/" +
      "quote/${category.categoryId}")
      .toUri()
    return PendingIntent.getActivity(
      context,
      REQUEST_BUBBLE,
      Intent(context, QuoteBubbleActivity::class.java)
            .setAction(Intent.ACTION_VIEW)
            .setData(contentUri),
        PendingIntent.FLAG_UPDATE_CURRENT
    )
  }
This generates PendingIntent, which BubbleMetadata uses to open the category indicated by the ID in contentUri.
Now, still in NotificationHelper, add:
private fun createBubbleMetadata(
  icon: Icon,
  fromUser: Boolean,
  category: Category
): Notification.BubbleMetadata {
  return Notification.BubbleMetadata.Builder(
    // 1
    createPendingQuoteBubbleIntent(category),
    icon
  )
  // 2
  .setDesiredHeightResId(R.dimen.bubble_height)
  .apply {
    // 3
    if (fromUser) {
      setAutoExpandBubble(true)
      setSuppressNotification(true)
    }
  }
  .build()
 }
The code above generates BubbleMetadata. Here’s what it does:
- The bubble uses
PendingIntent, which contains the activity for the expanded bubble. - The expanded bubble will present at the desired height.
- If the user requested the bubble explicitly, it automatically displays in expanded form so there’s no reason to show a notification along with the bubble.
Now, locate showNotification and add the following, right before the call to notify on NotificationManager:
val bubbleMetaData = createBubbleMetadata(
  icon,
  fromUser,
  quoteAndCategory.category
)
notification.setBubbleMetadata(bubbleMetaData)
The code above creates BubbleMetadata and associates it with the notification. This gives the notification the information it needs to be a bubble.
Making Your Activities Bubble
For an activity to appear in a bubble, you need to make a few changes in AndroidManifest.xml. Start by adding the following attributes in the activity tag for QuoteBubbleActivity:
android:allowEmbedded="true"
android:documentLaunchMode="always"
android:resizeableActivity="true"
These attributes allow the activity to display inside a bubble. Here’s how:
-
allowEmbedded="true"lets you embed the bubble’s activity in the System UI. -
resizeableActivity="true"lets the System UI resize the expanded bubble. -
documentLaunchMode="always"declares that the System UI needs this attribute so it can create multiple instances of this activity.
Build and run, select a category and launch a notification:
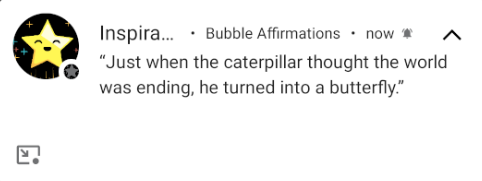
Now, the notification has a square icon at the bottom-left. Tapping this icon launches the notification in a bubble:

You can now close the bubble by tapping and dragging the bubble icon to the close icon at the bottom:

Detecting Bubble User Permissions
Because the user can opt out of bubble notifications for specific apps or conversations, it’s handy to know when they’ve allowed bubbling. In NotificationHelper.kt, replace the body of canBubble with:
val channel = notificationManager.getNotificationChannel(
  CHANNEL_QUOTES,
  category.shortcutId
)
return notificationManager.areBubblesAllowed()
  || channel?.canBubble() == true
Because the user can turn off bubbles at multiple levels, you query notificationManager and channel to see if bubbles are allowed.
With this code in place, build and run and select the same category you selected before and allowed to bubble:

The icon at the top-right changed from the notification bell to a more effervescent-looking icon, indicating that quotes from this category can bubble. Look at the other categories and you’ll see they still have the bell icon. That’s because, by default, the app has permission for selected conversations to bubble. The user can selectively change these settings under the notification settings for the app:
