Android TV: Getting Started
Learn how to create your first Android TV app! In this tutorial, you’ll create an Android TV app for viewing RayWenderlich Youtube channel videos! By Ivan Kušt.
Android TV differs a bit from Android phones. The main differences are showing the user interface (UI) on a large screen and needing to use a remote to navigate through options. In this tutorial, you’ll create an Android TV app for viewing raywenderlich.com YouTube channel videos!
In the process, you’ll learn:
- What you have to do for your app to qualify as a TV app
- What Android Leanback library is
- How to create video catalog, details and playback screens
- How to test your new app on Android TV emulator
Don’t worry, it’s easier than you think!
Getting Started
Android TV contains the Android system. If you know how to build layouts for Android Phones or Tablets, you’ll find building TV layouts pretty easy. TV apps have the same code structure as those for phones and tablets.
There are some caveats and requirements, though. Your app has to fill some criteria to be available from Play Store on Android TV. For example, you have to declare a TV Activity — more on that later.
To get started, download the Netderlix project using the Download Materials button at the top or bottom of this tutorial.
Open the project in Android Studio 4.1 or later by selecting Open an Existing Project on the Android Studio welcome screen or by selecting File ▸ Open if you have another project open already.
Wait for the project to sync. Then, build and run the project on a phone or existing phone emulator. For now, it’s fine to run the app this way because you’ll set up a TV emulator shortly.

You see the main (video catalog) screen that you’ll fill with videos from raywenderlich.com YouTube channel.
Netderlix Code Structure
First, get familiar with the code. The following graph shows all the screens in the Netderlix app:

There are three screens:
- Catalog screen for picking a video implemented in
CatalogFragment. - Video Details screen shown after the user picks a video implemented in
VideoDetailsFragment. It also shows recommended videos the user can navigate to. - Video Playback screen implemented in
VideoPlaybackFragment. It has standard playback controls for Play / Pause, Fast Forward / Rewind and Skip to the beginning and end of the video.
Code in the project is organized in the following way:
- catalog package contains the code for the Catalog screen.
- details package contains the code for the Details screen.
- playback package contains the code for the Playback screen.
-
error package contains
ErrorFragmentfor showing errors. - model package contains data classes that hold video and playlist data.
-
repository package contains
PlaylistsRepositoryfor fetching playlists and videos. - Util class in the root package contains utility methods.
Now, you’ll set up an Android TV emulator so you can test your new app. Feel free to skip the next section if you already have a TV emulator (or real Android TV) set up.
Setting up Android TV Emulator
The simplest way to test your Android TV app is to use an Android TV emulator provided by Android SDK. To set SDK up, select Tools ▸ SDK Manager in Android Studio.

Check Show Package Details to show detailed options for each Android version. Under Android 10.0 (Q), make sure you check Android TV Intel x86 Atom System Image.

Tap OK, confirm changes on the dialog and wait for the download to complete if needed.
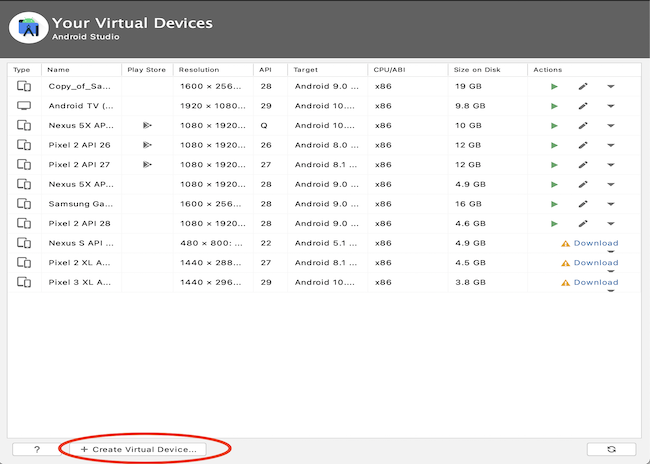
Now, you have to create an Android TV emulator to test on. Open Tools ▸ AVD Manager in Android Studio and click Create Virtual Device.

If you already have some emulators set, you see a bit different AVD manager screen.
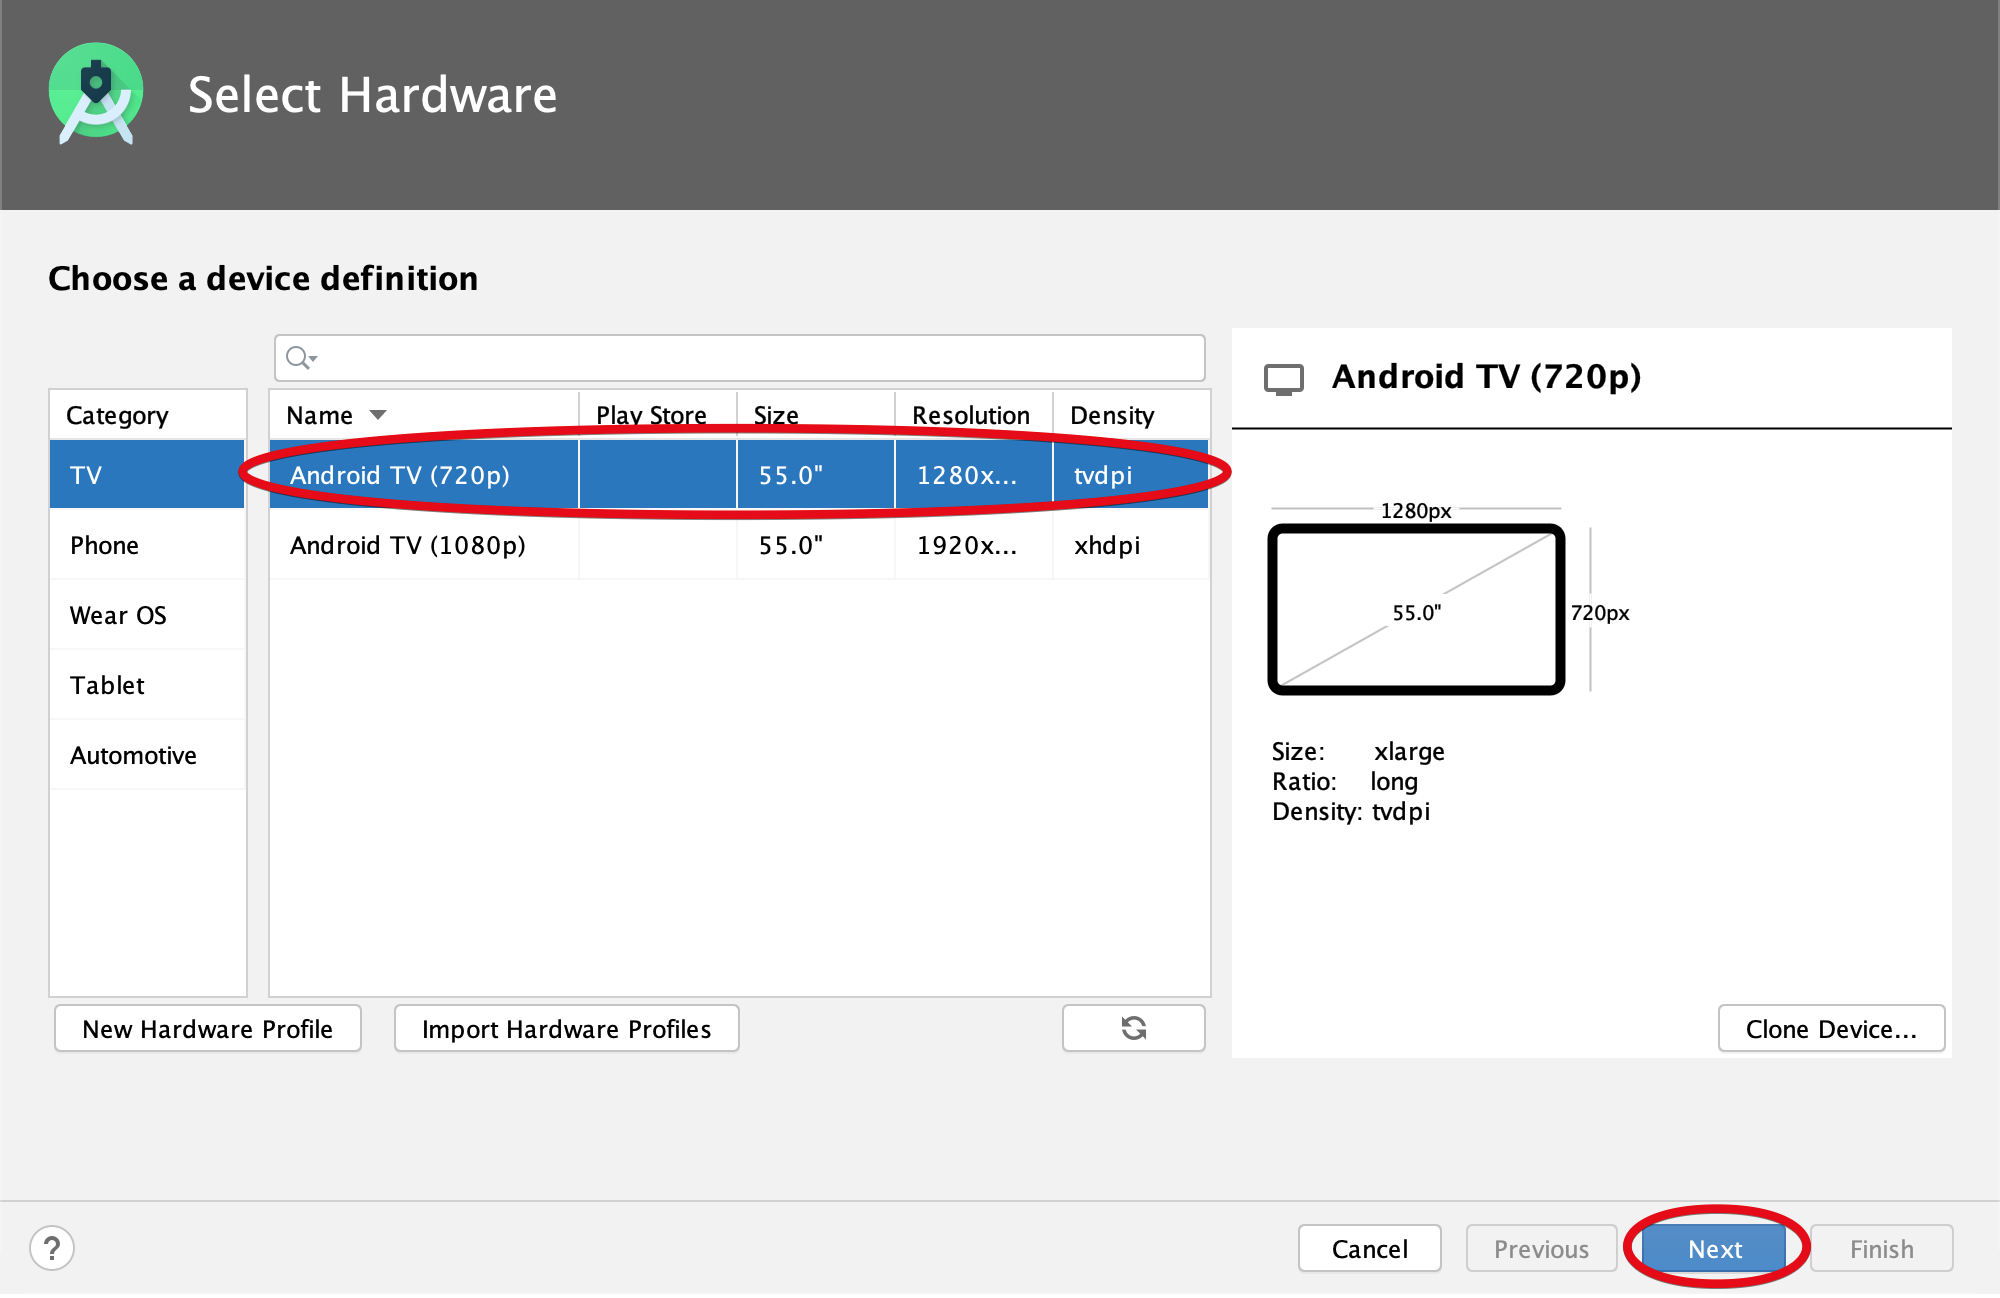
In the wizard, select TV under Category.

Select Android TV (720p) and click Next. It emulates smaller TV screens so it uses less computer memory when running.
On the next screen, select Android 10.0 and click Next.

Finally, click Finish and wait a few seconds for the new device to set up.

Build and run on the new TV emulator.

The Leanback Library
There are two key things to note when building user interfaces for TV devices:
- You navigate the TV user interface by using a remote. This means your app must support D-pad input.
- A TV screen is large and usually viewed from farther away.
Leanback library makes building UIs with these two things in mind easy.
AppCompatActivity, which sets up action bar, you get an error. For more information, check the official documentation.
To get a sense of how the Leanback library works, look at a diagram that shows the most important classes:
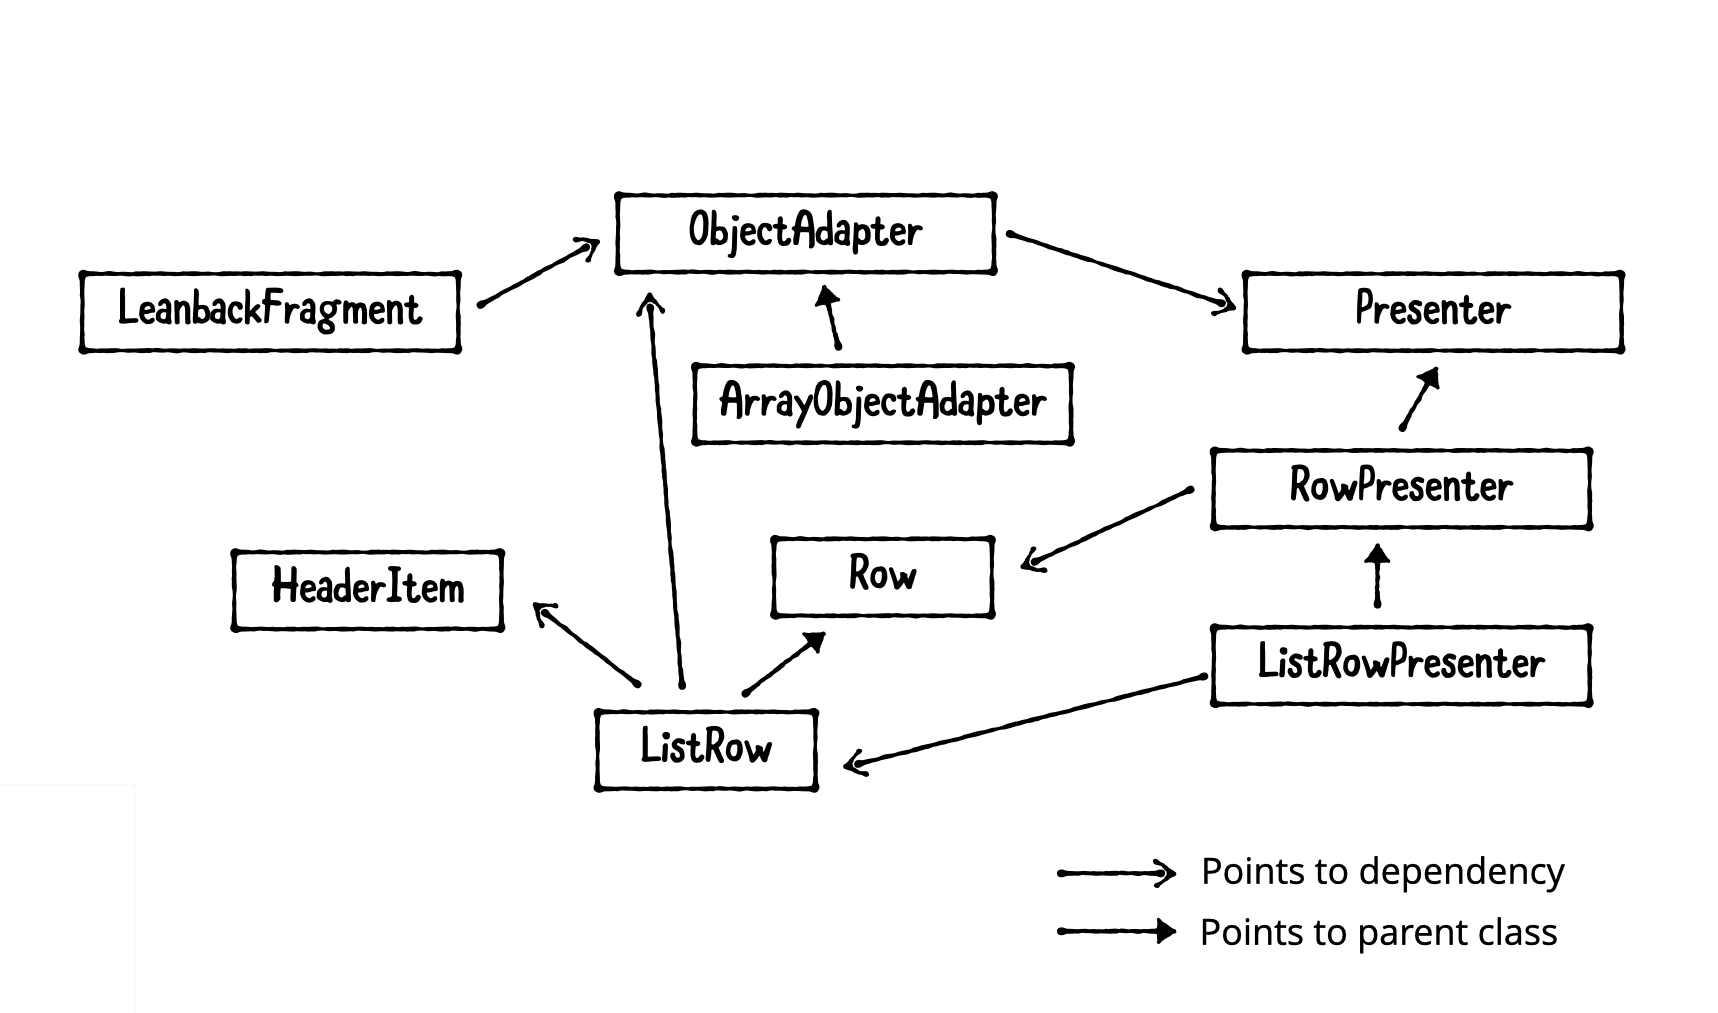
LeanbackFragment represents any of the Support fragments provided in the library. You’ll use three of them:
- BrowseSupportFragment for implementing a screen with catalog browser
- DetailsSupportFragment for implementing a screen with details
- PlaybackSupportFragment for implementing a screen with video player
You can think of each of the fragments as a RecyclerView. It renders rows provided by an adapter. The adapter is a subclass of ObjectAdapter, which relies on a subclass of Presenter. It converts adapter items into View instances displayed in Fragment.
ObjectAdapter items can be any type if you provide Presenter implementation that knows how to convert that type to View.
There are two existing types of presenters:
-
RowPresenter renders
Rowobjects intoViews. -
ListRowPresenter renders a special type of
Rowobjects that contain a header and a sublist.
Meeting Android TV App Criteria
Now that you’ve learned about the Leanback library, it’s time to meet the requirements and make a bona fide Android TV app.
Open AndroidManifest.xml and replace category in intent-filter with the following:
<category android:name="android.intent.category.LEANBACK_LAUNCHER" />
To declare a TV launcher activity, you use android.intent.category.LEANBACK_LAUNCHER intent filter the same way you use android.intent.category.LAUNCHER.
Build and run.
There’s no difference because the TV emulator lets you run the app without LEANBACK_LAUNCHER intent filter. On a real TV device, the app won’t appear without LEANBACK_LAUNCHER intent filter and Play Store won’t make your app available for TV devices.
The second requirement is to declare that the app uses the Leanback user interface required by Android TV.
Add the following tag right after opening manifest tag in AndroidManifest.xml:
<uses-feature
  android:name="android.software.leanback"
  android:required="true" />
Here, you set the Leanback user interface.
Below the previous code, add:
<uses-feature
      android:name="android.hardware.touchscreen"
      android:required="false" />
This declares that the app doesn’t require a touchscreen.
The last requirement is to add launcher banner. The drawable for launcher banner is already included in the project under res/drawable/banner.xml. To set it up, add a new property to application:
android:banner="@drawable/banner"
Build and run. Close the running app, open an app list and notice the new Netderlix app banner.
