Unreal Engine 4 Particle Systems Tutorial
In this Unreal Engine 4 tutorial, you will learn how to create particle systems and update them using Blueprints. By Tommy Tran.
Particle systems are a key component to visual effects. They allow artists to easily create effects such as explosions, smoke and rain.
Unreal Engine 4 has a robust and easy-to-use system to create particle effects called Cascade. This system allows you to create modular effects and easily control particle behaviour.
In this tutorial, you will learn how to:
- Create a particle system
- Set the velocity and size of a particle
- Adjust the particle spawn rate
- Scale the particle’s size over its lifetime using curves
- Set the particle color using Cascade
- Activate and deactivate a particle system using Blueprints
- Set particle colors using Blueprints
- Part 1: Getting Started
- Part 2: Blueprints
- Part 3: Materials
- Part 4: UI
- Part 5: How To Create a Simple Game
- Part 6: Animation
- Part 7: Audio
- Part 8: Particle Systems (you are here!)
- Part 9: Artificial Intelligence
- Part 10: How to Create a Simple FPS
Getting Started
Download the starter project and unzip it. Navigate to the project folder and open SpaceshipBattle.uproject.
Press Play to start the game. Hold left-click to shoot and use W, A, S and D to move around.

In this tutorial, you will create two particle effects. One for the ship’s thrusters and one for when a ship explodes. To create these, you will use particle systems.
What is a Particle System?
As its name suggests, a particle system is a system to create and manage particles. A particle is basically a point in space. Using particle systems, you can control the appearance and behaviour of the particle.
Particle systems consist of one or more components called emitters. These are responsible for spawning particles.

Emitters also have components called modules. Modules control specific properties of the particles spawned by the emitter. For example, the material and initial velocity of a particle. In the example below, two modules are used to give each particle a red circle material and random velocity.

You can also change a particle’s color over its lifetime. In this example, the particle’s color changes from red to blue:

Now that you know what a particle system is, it’s time to create one for the ship’s thrusters.
Creating a Particle System
Navigate to the ParticleSystems folder and click Add New\Particle System. Rename the particle system to PS_Thruster and then open it.
Cascade: The Particle System Editor
Cascade is composed of four main panels:
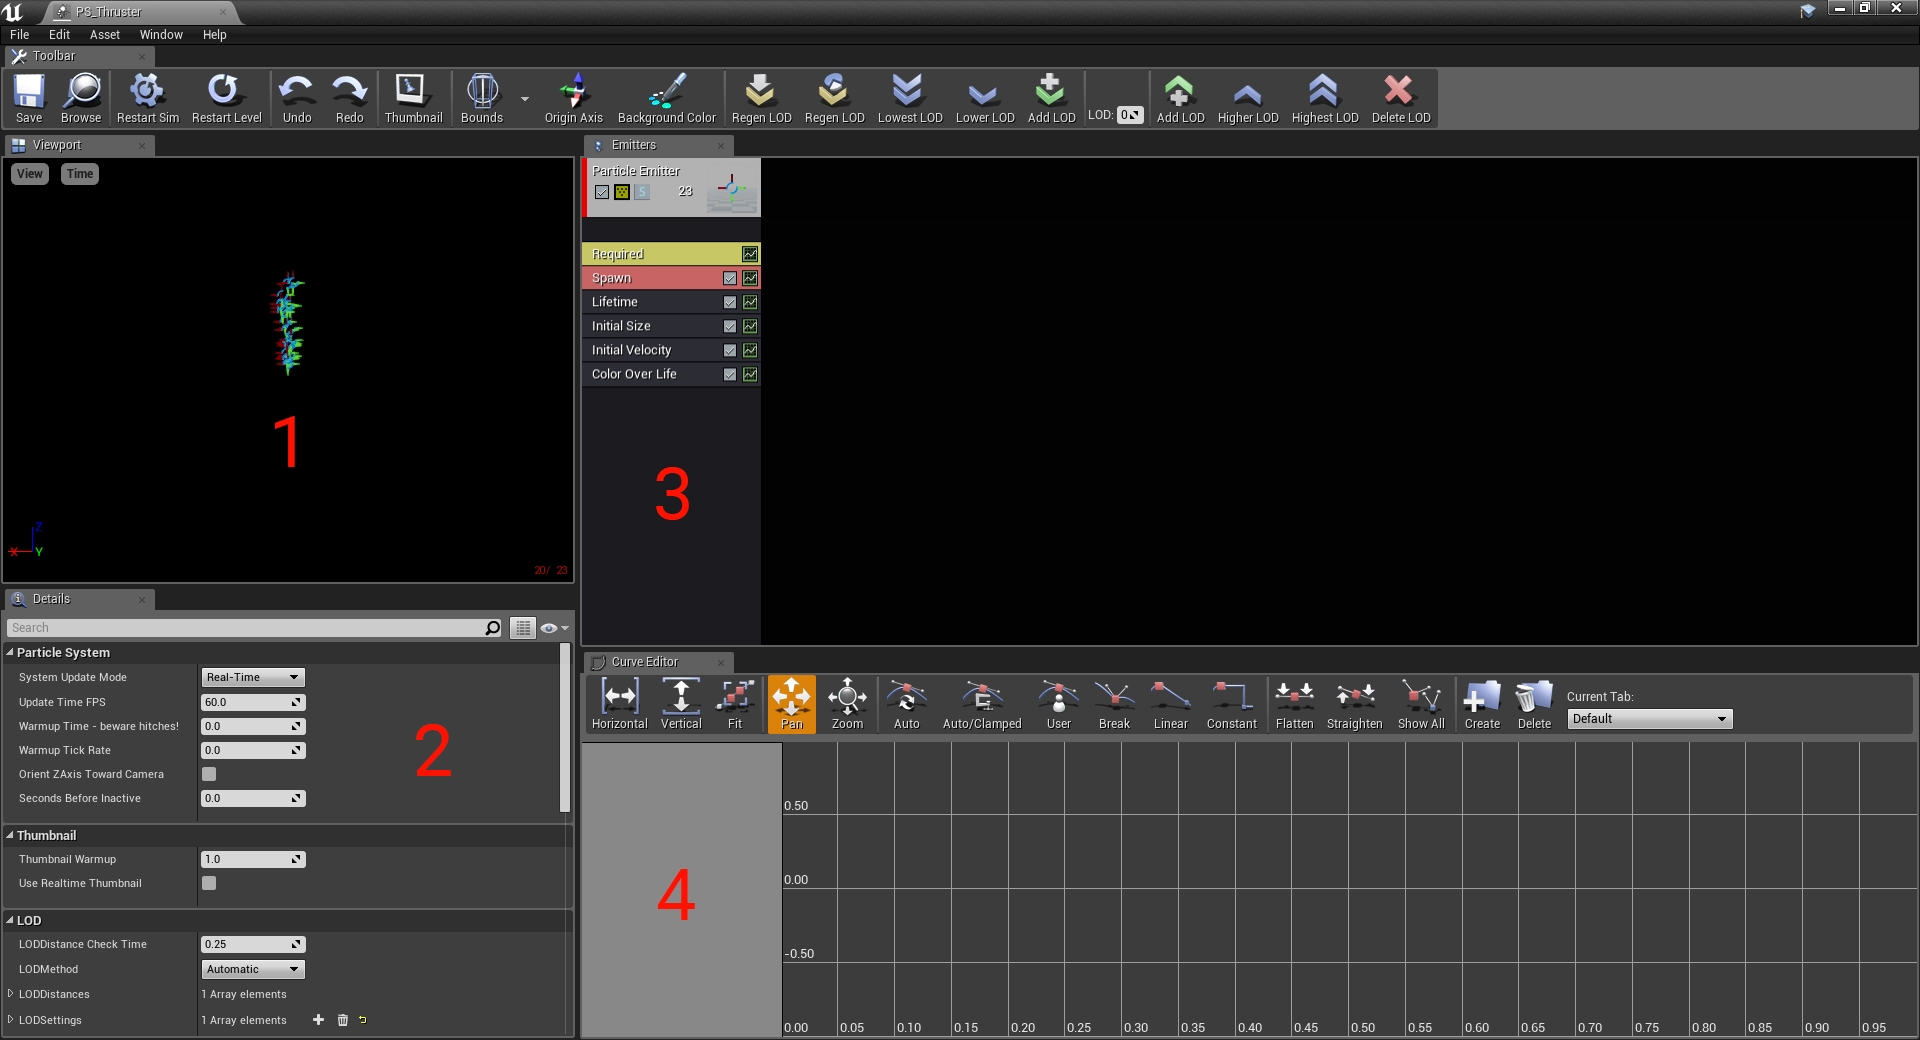
- Viewport: This panel will display a preview of your particle system. You can look around by holding right-click and moving your mouse. To move, hold right-click and use the WASD keys.
- Details: Any component (emitters, modules etc.) you select will have its properties displayed here. If nothing is selected, it will display the properties for the particle system.
- Emitters: This panel will show a list of emitters from left to right. Each emitter displays a list of its modules.
- Curve Editor: The Curve Editor allows you to visualize and adjust the values of a module’s curves. Not all module properties support curves.
Right now, the particle system is using the default particle material.

To start, you will replace the particle material with a circle material.
Applying a Material to Particles
Go to the Emitters panel and select the Required module.

The Required module contains necessary properties such as particle material and emitter duration. Every emitter must have a Required module.
To change the material, go to the Details panel and set Material to M_Particle. This will change the particle’s appearance to an orange circle.

Next, you will attach the particle system to the player’s ship.
Attaching the Particle System
Go back to the main editor and navigate to the Blueprints folder. Open BP_Player and then go to the Components panel.
To use a particle system, you can use a Particle System component. Create one and rename it to ThrusterParticles. Make sure you attach it to the Collision component.

To specify a particle system, go to the Details panel and locate the Particles section. Set Template to PS_Thruster.
Next, set the Location of ThrusterParticles to (-80, 0, 0). This will place it behind the ship.

Finally, set the Rotation to (0, 90, 0). This will orient the particle system so that the particles move away from the ship.

Click Compile and then go back to the main editor. Press Play to see the particle system in effect.

The particle system is working but the particles move a bit too slowly and are very small. You can fix this by setting the particle’s initial velocity and size.
Setting a Particle’s Velocity and Size
First, you will set the initial velocity of the particles. Open PS_Thruster and then select the Initial Velocity module. Afterwards, expand Start Velocity\Distribution.
By default, a particle’s initial velocity will range from (-10, -10, 50) to (10, 10, 100).

To move the particles away from the ship at a faster speed, all you need to do is increase the Z velocity. Set Min Z to 300 and Max Z to 400.

Here is a comparison between the original and new velocities:

Next, you will set the initial size of the particles.
Setting the Particle’s Size
Select the Initial Size module and then go to the Details panel. Afterwards, expand Start Size\Distribution.
Like the Initial Velocity module, Initial Size also has a minimum and maximum range. However, for this tutorial, you will set the size to be a constant value. To do this, set Distribution to Distribution Vector Constant.

Afterwards, set Constant to (70, 70, 70). Here is a size comparison:

Go back to the main editor and press Play.

The particles are looking better but they’re still spaced quite far apart. This is because the duration between particle spawning is too large. To fix this, you can increase the spawn rate.