Unreal Engine 4 Blueprints Tutorial
In this Unreal Engine 4 blueprints tutorial, you will learn how to use blueprints to create a player character, set up inputs and make an item disappear when the player touches it. By Ricardo Santos.
4.9 (75) · 1 Review
Getting the Player Direction
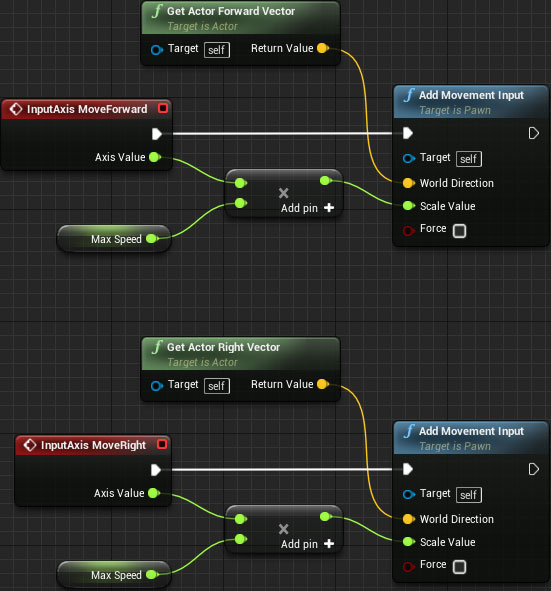
To move forward, you need to know where the Pawn is facing. Luckily, Unreal has a node for that purpose. Add a Get Actor Forward Vector node.

Next, add a Add Movement Input node. This node will take in a direction and value and convert it to a stored offset. Connect the nodes like so:

The white line represents a chain of execution. In other words, when the player moves the input axis, an event will generate that will execute the InputAxis MoveForward node. The white line represents that once this happens, you will then execute the Add Movement Input node.
The Add Movement Input node takes the following inputs:
- Target: set to self, which in this case is the player (the red box).
- World Direction: The direction to move the target, which in this case is the direction the player is facing.
- Scale Value: How much to move the player, which in this case is the max speed * the axis value (which remember is a value in the range of -1 to 1).
Repeat the process for MoveRight but replace Get Actor Forward Vector with Get Actor Right Vector. See how much you can do yourself without reviewing the instructions above!
Adding the Offset
To actually move the Pawn, you need to get the offset calculated by Add Movement Input and add it to the Pawn’s location.
Basically your strategy will be to move the player a small amount each frame of your game, so you’ll need to add the movement to an Event Tick event, which is generated every frame.
Navigate to the Event Tick node in your Event Graph. It should be grayed out to the left, but create one if you don’t have it.

To get the offset, create a Consume Movement Input Vector node. To add the offset, create an AddActorLocalOffset node. Afterwards, link them like so:
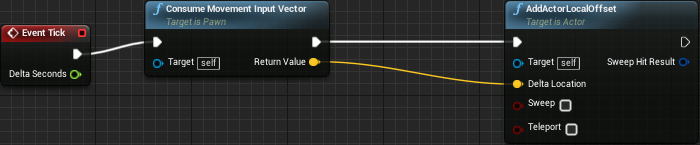
Basically, this means that each frame of the game, you’ll get any stored movement input, and add it to the actor’s current location.
Click Compile, and go back to the main editor and click Play. You will now be able to move around!

There is one small problem though. Higher end machines are be able to render frames at a quicker rate. Since Event Tick is called every frame, the movement nodes will execute more often. This results in the Pawn moving at a faster rate on high end machines and vice versa.
To fix this, your movement needs to be frame rate independent.
Frame Rate Independence
Frame rate independence means everything will have the same result, regardless of frame rate. Thankfully, achieving frame rate independence in Unreal is easy.
Exit the game and then open up BP_Player. Next, navigate to your Event Tick node and take a look at Delta Seconds.

Delta Seconds is the amount of time elapsed since the last Event Tick. By multiplying your offset with Delta Seconds, your movement will be frame rate independent.
For example, your Pawn has a maximum speed of 100. If one second had passed since the last Event Tick, your Pawn would move the full 100 units. If half a second had passed, it would move 50 units.

If the movement is frame rate dependent, the Pawn will move 100 units every frame, regardless of the time between frames.
To multiply your offset with Delta Seconds, add a vector * float node. Afterwards, connect your nodes like so:
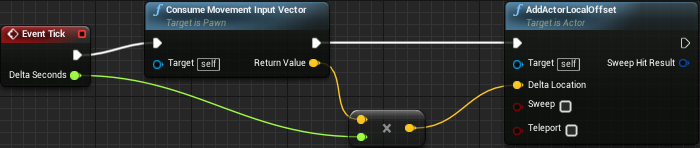
Because the time between frames (Delta Seconds) is very small, your Pawn will move a lot slower. Fix this by changing the default value of MaxSpeed to 600.
![]()
Congratulations, you have successfully achieved frame rate independence!

You might have noticed that the cube passes right through everything. To fix that, you need to learn about collisions.
Strap on your safety helmet because you’re about to have a head-on collision with some theory!
Actor Collisions
When you think of a collision, you probably think of cars crashing into each other. Luckily, collisions in Unreal are much safer.
To be able to collide, an actor needs a representation of its collidable space (usually called collision). You can use one of the following:
- Collision mesh: These are auto generated (if you enable it) when a mesh gets imported. The user can also create a custom collision mesh using 3D software. The red box already has an auto generated collision mesh.
- Collision component: These come in three shapes: box, capsule and sphere. You can add them through the Components panel. Generally used for simple collision.
Below is an example of a character and its collision.
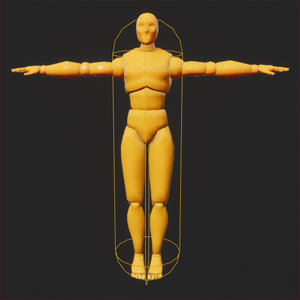
A collision occurs when an actor’s collision touches another actor’s collision.

Now, it’s time to enable collision.
Enabling Collision
You’re probably wondering why the box didn’t collide, even though it has a collision mesh. When you move an actor, Unreal only considers the root component for collisions. Since your Pawn’s root component doesn’t have any collision, it passes through everything.
So, to use the collision mesh, StaticMesh needs to be the root. To do this, go to the Components panel. Next, left-click and drag StaticMesh to DefaultSceneRoot. Release left-click to make StaticMesh the new root.
There is one more thing to do before collisions will work. Switch to the Event Graph and go to the AddActorLocalOffset node. Locate the Sweep input and set it to true by left-clicking the checkbox.
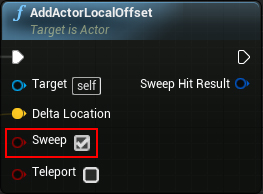
Basically, AddActorLocalOffset teleports the actor to a new location. Sweep makes sure the actor collides with anything that is between the old and new locations.
Go back to the main editor and click Play. The cube will now collide with the level!

The last thing you will do is create an item that disappears when the player touches it.