Vision Tutorial for iOS: Detect Body and Hand Pose
Learn how to detect the number of fingers shown to the camera with help from the Vision framework. By Saeed Taheri.
Displaying Fingertips
pointsProcessorHandler is going to get your detected fingerprints on the screen. You have to pass the closure from SwiftUI to this view controller.
Go back to CameraView.swift and add a new property:
var pointsProcessorHandler: (([CGPoint]) -> Void)?
This gives you a place to store the closure in the view.
Then update makeUIViewController(context:) by adding this line before the return statement:
cvc.pointsProcessorHandler = pointsProcessorHandler
This passes the closure to the view controller.
Open ContentView.swift and add the following property to the view definition:
@State private var overlayPoints: [CGPoint] = []
This state variable will hold the points grabbed in CameraView. Replace the CameraView() line with the following:
CameraView {
  overlayPoints = $0
}
This closure is the pointsProcessorHandler you added earlier and is called when you have the detected points. In the closure, you assign the points to overlayPoints.
Finally, add this modifier before the edgesIgnoringSafeArea(.all) modifier:
.overlay(
  FingersOverlay(with: overlayPoints)
    .foregroundColor(.orange)
)
You’re adding an overlay modifier to CameraView. Inside that modifier, you initialize FingersOverlay with the detected points and set the color to orange.
FingersOverlay.swift is inside the starter project. Its only job is to draw points on screen.
Build and run. Check out the orange dots on your fingers. Move your hands around and notice the dots follow your fingers.

.overlay modifier if you need.It’s finally time to add game logic.
Adding Game Logic
While the logic of the game is long, it’s pretty straightforward.
Open GameLogicController.swift and replace the class implementation with:
// 1
private var goalCount = 0

// 2
@Published var makeItRain = false

// 3
@Published private(set) var successBadge: Int?

// 4
private var shouldEvaluateResult = true

// 5
func start() {
  makeItRain = true
}

// 6
func didRainStars(count: Int) {
  goalCount = count
}

// 7
func checkStarsCount(_ count: Int) {
  if !shouldEvaluateResult {
    return
  }
  if count == goalCount {
    shouldEvaluateResult = false
    successBadge = count

    DispatchQueue.main.asyncAfter(deadline: .now() + 3) {
      self.successBadge = nil
      self.makeItRain = true
      self.shouldEvaluateResult = true
    }
  }
}
Here’s a breakdown:
- This property stores the number of dropped stars. The player has to guess this value by showing the appropriate number of fingers.
- Whenever something sets this published property to
true,StarAnimatorstarts raining. - If the player correctly guesses the number of dropped stars, you assign the goal count to this. The value appears on screen indicating success.
- This property prevents an excessive amount of evaluation. If the player guesses the value correctly, this property makes the evaluation stop.
- This is how the game starts. You call this when the starting screen appears.
- When
StarAnimatorrains a specific amount of stars, it calls this method to save the goal count in the game’s engine. - This is where the magic happens. You call this method whenever new points are available. It first checks if evaluating the result is possible. If the guessed value is correct, it stops the evaluation, sets the success badge value and resets the engine’s state to initial values after three seconds.
Open ContentView.swift to connect the GameLogicController.
Replace the call to StarAnimator, including its trailing closure, with:
StarAnimator(makeItRain: $gameLogicController.makeItRain) {
  gameLogicController.didRainStars(count: $0)
}
This code reports the number of rained stars to the game engine.
Next, you’ll let the player know they’ve got the answer right.
Adding a Success Badge
Add a computed property for successBadge as follows:
@ViewBuilder
private var successBadge: some View {
  if let number = gameLogicController.successBadge {
    Image(systemName: "\(number).circle.fill")
      .resizable()
      .imageScale(.large)
      .foregroundColor(.white)
      .frame(width: 200, height: 200)
      .shadow(radius: 5)
  } else {
    EmptyView()
  }
}
If the successBadge of the game logic controller has a value, you create an image using a system image available in SFSymbols. Otherwise, you return an EmptyView which means drawing nothing.
Add these two modifiers to the root ZStack:
.onAppear {
  // 1
  gameLogicController.start()
}
.overlay(
  // 2
  successBadge
    .animation(.default)
)
Here’s what you added:
- When the starting page of the game appears, you start the game.
- You draw the success badge on top of everything. The
successBadgeimplementation comes next.
Next, remove the overlay for Rain since it now rains automatically.
Final Step
To make the game work, you need to pass the number of detected points to the game engine. Update the closure that you pass when initializing CameraView in ContentView:
CameraView {
  overlayPoints = $0
  gameLogicController.checkStarsCount($0.count)
}
Build and run. Enjoy the game.

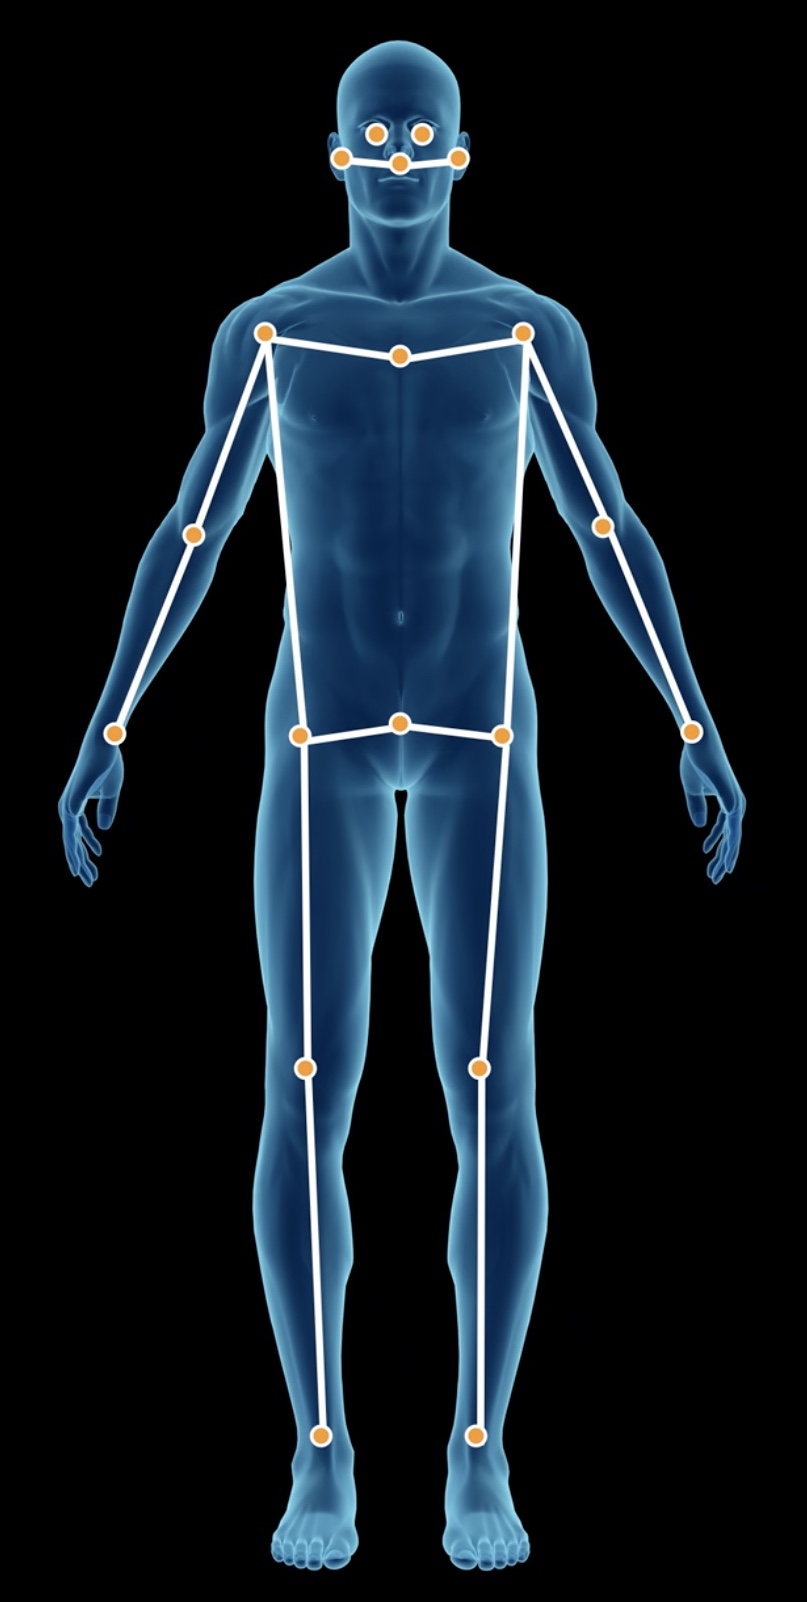
More Use Cases
You barely scratched the surface of Hand and Body Detection APIs in Vision. The framework can detect several body landmarks, as illustrated below:
Here are some examples of what you can do with these APIs:
- Install UI controls in your app using Vision framework. For example, some camera apps include features that let you show a hand gesture to take a picture.
- Build a fun emoji app where the user could show the emoji with hands.
- Build a workout analysis app where the user could find out if he or she is doing a specific action right.
- Build a music app to teach the user to play guitar or ukulele.


The possibilities are endless with Vision.
Where to Go From Here?
Download the final project using the Download Materials button at the top or bottom of this tutorial.
You’ve successfully created a game with Hand Detection APIs! Great job!
There are many great resources for Vision and these specific APIs. To explore this topic in more depth, try:
- WWDC 2020 Video on Body and Hand Detection APIs: A video with many more examples.
- Vision Framework Documentation: The overview of all the features available in Vision framework.
- Detecting Human Body Poses in Images: Documentation and an example app by Apple.
- raywenderlich.com Forums: Ask for help from our awesome community.
I hope you liked this tutorial. If you have any questions or comments, please join the discussion below!