Getting Started With Flutter

Dive into the Flutter framework, which lets you build iOS, Android, web and desktop apps with a single codebase, by writing a cross-platform app using VS Code. By Jonathan Sande.

4.9 (12) · 3 Reviews

Download materials
Save for later
Share
Update note: Jonathan Sande updated this tutorial for Flutter 2.2 and Dart 2.13. Joe Howard wrote the original and Nishant Srivastava made a previous update.

With various operating systems running the world’s mobile and desktop devices, cross-platform development has long been a goal for app development. Being able to write one codebase and deploy to multiple platforms saves significant time and effort for your company and team.

One of the most recent frameworks to enter the cross-platform arena is Flutter from Google. While Flutter initially only supported the Android and iOS mobile platforms, it has since expanded to include support for the web, macOS, Windows, Linux, Fuchsia and embedded devices. This — in combination with Flutter’s fast development cycle, flexible UI design and native app performance — make it a very attractive target for new and experienced developers alike.

In this tutorial, you’ll build a Flutter app called GHFlutter that queries the GitHub API for team members in a GitHub organization and displays the information in a scrollable list:

Final appearance of the GHFlutter app

You can develop the app using iOS Simulator, the Android emulator, a web browser, a native desktop app or all of the above!

Here are some things you’ll learn how to do with Flutter while you build the app:

  • Set up a development environment.
  • Create a new project.
  • Use hot reload.
  • Import files and packages.
  • Create and use widgets.
  • Make network calls.
  • Show items in a list.
  • Add an app theme.

You’ll also learn a little Dart along the way! :]

Getting Started

Download the starter project for this tutorial by clicking the Download Materials button at the top or bottom of this tutorial.

You can use macOS, Linux, Windows or Chrome OS for your Flutter development. While you can use any editor with the Flutter toolchain, there are IDE plugins for IntelliJ IDEA, Android Studio and Visual Studio Code that make the development cycle easier.

This tutorial uses VS Code.

Introduction to Flutter

Flutter apps use the Dart programming language. Dart shares many of the features of other modern languages, such as Kotlin and Swift. You can also transcompile Dart into JavaScript code. If you’d like to learn more about Dart before continuing with this Flutter tutorial, check out our Dart Basics tutorial.

As a cross-platform framework, Flutter most closely resembles React Native. Both allow for a reactive and declarative style of programming. Unlike React Native, however, Flutter doesn’t need to use a JavaScript bridge, which improves app startup times and overall performance. Dart achieves this by using Ahead-Of-Time (AOT) compilation.

Dart can also use Just-In-Time (JIT) compilation. JIT compilation with Flutter improves the development workflow by allowing a hot reload capability to refresh the UI during development without the need for an entirely new build.

As you’ll see in this tutorial, the Flutter framework is built around the idea of widgets. In Flutter, you don’t only use widgets for your app’s views, but also for entire screens and even for the app itself.

Setting up Your Development Environment

Find instructions for setting up your development machine with the Flutter framework on Flutter’s Get started page. The specific steps vary by platform, but they follow this basic format:

  1. Download the installation bundle for your development machine’s operating system to get the latest stable release of the Flutter SDK.
  2. Extract the installation bundle in the desired location.
  3. Add the flutter tool to your path.
  4. Run the flutter doctor command, which alerts you to any problems with the Flutter installation.
  5. Install missing dependencies.
  6. Set up your IDE with a Flutter plugin/extension.
  7. Test drive an app.

The instructions provided on the Flutter website are very well done and allow you to easily set up a development environment on your platform of choice. The remainder of this tutorial assumes you’ve set up VS Code for Flutter development and that you’ve addressed any issues flutter doctor found. You can also use Android Studio to follow along.

To run your project as a mobile app, you’ll need to use one of the following options:

  • Run either iOS Simulator or an Android emulator.
  • Have an iOS or Android device set up for development.
  • Run your code as a web app.
  • Finally, you can run your code as a desktop app.

Even if your final target is mobile, using a web or desktop app during development gives you the advantage of being able to resize the app and observe how it would look with various screen sizes. If you have an older computer, the web or desktop version will also load faster than the Android emulator or iOS Simulator.

Note: To build and test on iOS Simulator or an iOS device, you’ll need to use macOS with Xcode. Also, even if you’re planning to use VS Code as your main IDE, the easiest way to get the Android SDK and Android emulator is to install Android Studio as well.

Creating a New Project

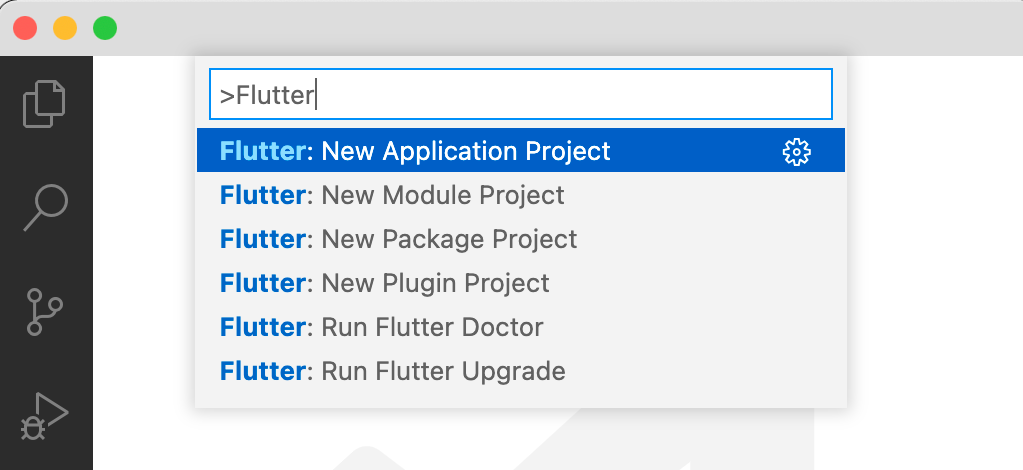
In VS Code with the Flutter extension installed, open the command palette by choosing View ▸ Command Palette… or pressing Command-Shift-P on macOS or Control-Shift-P on Linux or Windows. Enter Flutter: New Application Project into the palette and press Return.

Creating a new Flutter app in VS Code

Select a folder to store the project. Then, enter ghflutter for the project’s name, press Return and wait for Flutter to set up the project in VS Code. When the project is ready, you’ll see main.dart in your editor.

Default code for a new Flutter project

In VS Code, you see a panel on the left-hand side that shows your project structure. There are folders for Android, iOS and the web. These folders contain the files necessary to deploy your app on those platforms. There’s also a lib folder that contains main.dart and will have code that applies to both platforms. You’ll work mainly in the lib folder in this tutorial.

Testing is an important part of Flutter development. However, it isn’t the focus of this tutorial, so delete the test folder by right-clicking it and selecting Delete from the menu.

Editing the Code

Next, replace the code in main.dart with the following:

import 'package:flutter/material.dart';

void main() => runApp(const GHFlutterApp());

class GHFlutterApp extends StatelessWidget {
  const GHFlutterApp({Key? key}) : super(key: key);

  @override
  Widget build(BuildContext context) {
    return MaterialApp(
      title: 'GHFlutter',
      home: Scaffold(
        appBar: AppBar(
          title: const Text('GHFlutter'),
        ),
        body: const Center(
          child: Text('GHFlutter'),
        ),
      ),
    );
  }
}
Note: If you’re using VS Code, remember to save your changes to see them take effect. Select File ▸ Save from the VS Code menu or press Command-S on macOS or Control-S on Windows or Linux.

If you’re using Android Studio, don’t worry about purposefully saving — it autosaves by default.

In the code above, main uses the => operator for a single line function to run the app. You have one class for the app named GHFlutterApp.

Your app itself is a stateless widget. Most entities in a Flutter app are widgets, either stateless or stateful. You override build to create your app widget. Right after the return keyword, you see the MaterialApp widget, which helps your app conform to the Material Design guidelines.

Running the App

Now, it’s time to run your simple app. Click the currently selected platform in the bottom right to get a list of all the available platforms that can run your app. The image here shows that the Chrome web browser, iOS simulator and a Pixel Android emulator are available.

Platforms available for running the app

Select a platform — for example, the Pixel mobile emulator — and wait while the emulator launches.

Once the emulator is ready, build and run by pressing F5, by selecting Debug ▸ Start Debugging from the menu or by clicking the triangular Play icon in the top right. The Debug Console will open and, if you’re running on Android, you’ll see Gradle doíng the build. If running on iOS, you’ll see Xcode building the project.

Here’s the app running in the Android emulator:

App running in the Android emulator

Take a moment to appreciate the fact that you just ran your first Flutter app. Nice job!

The DEBUG banner you see across the top-right corner indicates that the app is running in debug mode.

Stop the running app by clicking the square red Stop button at the right of the toolbar that’s at the top of the VS Code window:

VS Code toolbar buttons

Return to the Project Explorer view by clicking the Explorer icon at the upper left of VS Code or by choosing View ▸ Explorer.

VS Code Project Explorer view

Using Hot Reload

One of the best aspects of Flutter development is that you can hot reload your app as you make changes. This feature allows you to get instant feedback as you update different parts of the UI.

Build and run again:

App running on the Android emulator

Now, without stopping the running app, change the app bar string in main.dart to something else:

appBar: AppBar(
  title: const Text('GHFlutter App'),
),

Previously, the banner read GHFlutter; now, it says GHFlutter App.

Now, save main.dart. This will automatically trigger a hot reload, but you can also click the Hot Reload button:

Hot Reload button

You’ll see the change reflected in the running app almost immediately:

App after pressing hot reload

The hot reload feature might not always work — the Hot Reload official docs do a really nice job of explaining the cases where it does not work — but overall, it’s a great time saver when you’re building out your UI.

Importing a File

Rather than keeping all your Dart code in the single main.dart file, you want to be able to import code from other files you create. You’ll see an example now for importing strings, which will help when you need to localize your user-facing strings.

Create a file named strings.dart in the lib folder by clicking lib and then clicking the New File button:

Create a new file in VS Code

Add the following line to the new file:

const appTitle = 'GHFlutter';
Note: If you have experience with a different programming language, you might be used to keeping the strings as static constants in a class. Dart allows top-level constants outside of a class. Grouping them in the same file is enough.

Add the following import to the top of main.dart:

import 'strings.dart' as strings;

Change your widget to use the new strings.dart. GHFlutterApp will look like this:

class GHFlutterApp extends StatelessWidget {
  const GHFlutterApp({Key? key}) : super(key: key);

  @override
  Widget build(BuildContext context) {
    return MaterialApp(
      title: strings.appTitle,
      home: Scaffold(
        appBar: AppBar(
          title: const Text(strings.appTitle),
        ),
        body: const Center(
          child: Text(strings.appTitle),
        ),
      ),
    );
  }
}

Save your changes and hot reload. The app is back in its original state now, but you’re using a string from strings.dart.

App running on the Android emulator

Understanding Widgets

Almost every element of your Flutter app is a widget. Widgets are designed to be immutable, or unchangeable, since using immutable widgets helps keep the app UI lightweight. You can think of widgets like blueprints that tell how the UI should look. A different look needs a different blueprint.

You’ll use two fundamental types of widgets:

  • Stateless: Widgets that depend only upon their own configuration info, such as a static image in an image view.
  • Stateful: Widgets that need to maintain dynamic information. They do so by interacting with a State object.

Both stateless and stateful widgets redraw whenever the Flutter framework tells them to. The difference is that the stateful widgets delegate their configuration to a State object.

Creating Widgets

To make your own widgets, go to the bottom of main.dart and start typing stful, an abbreviation for “stateful”. This will give you a pop-up similar to the following:

Shortcut for creating a stateful widget

Press Return to select the first option.

VS Code will help you fill in the name using multiple cursors. Write GHFlutter:

Creating a stateful widget in VS Code

This is the new code that you just added:

class GHFlutter extends StatefulWidget {
  const GHFlutter({ Key? key }) : super(key: key);

  @override
  _GHFlutterState createState() => _GHFlutterState();
}

class _GHFlutterState extends State<GHFlutter> {
  @override
  Widget build(BuildContext context) {
    return Container(
      
    );
  }
}

Here are some things to note:

  • You’ve made a StatefulWidget subclass named GHFlutter.
  • The line that begins with const is the class constructor.
  • You’re overriding createState to create the stateful widget’s state object.
  • _GHFlutterState is the name of the state class. The underscore in front of _GHFlutterState means that this class is file-private. It can’t be imported into other files.
  • build is the primary place where you construct your widgets. This one currently returns an empty Container by default. You’ll swap that out with something else next.

Replace the entire build method in _GHFlutterState with the following:

@override
Widget build(BuildContext context) {
  return Scaffold(
    appBar: AppBar(
      title: const Text(strings.appTitle),
    ),
    body: const Text(strings.appTitle),
  );
}

A Scaffold is a container for Material Design widgets. It acts as the root of a widget hierarchy. Here, you’ve added an AppBar and a body to the Scaffold, and each contains a Text widget.

Replace GHFlutterApp with the following code:

class GHFlutterApp extends StatelessWidget {
  const GHFlutterApp({Key? key}) : super(key: key);

  @override
  Widget build(BuildContext context) {
    return MaterialApp(
      title: strings.appTitle,
      home: const GHFlutter(),
    );
  }
}

Now, GHFlutterApp uses your new GHFlutter as its home attribute, instead of building a Scaffold of its own.

Note: The keyword const, which you sometimes see in front of widgets and variables, indicates a compile-time constant. It’s not always possible or necessary to add const, but doing so allows Flutter to make some optimizations.

Hot reload and you’ll see the new widget in action:

New Flutter layout using GHFlutter stateful widget

You haven’t changed much yet, but now you’re set up to build out the new widget.

Making Network Calls

Earlier, you imported strings.dart into the project. Similarly, you can import other packages from the Flutter framework or even from other developers. For example, you’ll now use a couple of additional packages to make an HTTP network call and parse the resulting JSON response into Dart objects.

Importing Packages

Add two new imports at the top of main.dart:

import 'dart:convert';
import 'package:http/http.dart' as http;

You’ll notice the http package isn’t available. That’s because you haven’t added it to the project yet.

Navigate to pubspec.yaml in the root folder of your project. In the dependencies section, right under cupertino_icons: ^1.0.2, add the following line:

http: ^0.13.3
Note: Pay attention to the indentation. Use the same two-space indentation that the cupertino_icons package has.

Now, when you save your pubspec.yaml, the Flutter extension in VS Code will run the flutter pub get command. Flutter will get the declared http package and make it available in main.dart.

You’ll now see blue lines under your two most recent imports in main.dart, which indicates they’re currently unused.

Unused imports have a blue underline

Don’t worry. You’ll use them in just a bit.

Using Asynchronous Code

Dart apps are single-threaded, but Dart provides support for running code on other threads. It also supports running asynchronous code that doesn’t block the UI thread. It uses the async/await pattern to do this.

Note: Many beginners incorrectly assume that asynchronous methods run on another thread. While I/O tasks like the network calls you delegate to the system do run on a different system thread, the code you write yourself inside of async methods all runs on the UI thread. It’s just scheduled to run later, when the UI isn’t busy. If you actually did want to run some code on another thread, then you’d need to create what’s called a new Dart isolate.

Next, you’ll make an asynchronous network call to retrieve a list of GitHub team members. To do this, add an empty list as a property in _GHFlutterState as well as a property to hold a text style:

var _members = <dynamic>[];
final _biggerFont = const TextStyle(fontSize: 18.0);

As you learned earlier, the underscores at the beginning of the names make the members of the class file-private. The dynamic keyword tells Dart that the list could hold anything. Generally, it’s not ideal to use dynamic because it opts out of the type safety system that Dart has. However, when making network calls, dealing with dynamic is unavoidable.

To make the asynchronous HTTP call, add _loadData to _GHFlutterState:

Future<void> _loadData() async {
  const dataUrl = 'https://api.github.com/orgs/raywenderlich/members';
  final response = await http.get(Uri.parse(dataUrl));
  setState(() {
    _members = json.decode(response.body) as List;
  });
}

Here, you’ve added the async keyword onto _loadData to tell Dart that it’s asynchronous. Another clue that it’s asynchronous is the Future return type. You put await in front of http.get() because that’s another asynchronous call that might take a while.

When the HTTP call completes, you pass a callback to setState that runs synchronously on the UI thread. In this case, you’re decoding the JSON response and assigning it to the _members list. If you set _members without calling setState, then Flutter wouldn’t rebuild the UI and your users wouldn’t realize that the state had changed.

Add an initState override to _GHFlutterState:

@override
void initState() {
  super.initState();
  _loadData();
}

This method calls _loadData when the state class is first created.

Now that you’ve created a list of members in Dart, you need a way to display them in a list in the UI.

Using a ListView

Dart provides a ListView that lets you show the data in a list. ListView acts like a RecyclerView on Android or a UICollectionView on iOS, recycling views as the user scrolls through the list to achieve smooth scrolling performance.

Add _buildRow to _GHFlutterState:

Widget _buildRow(int i) {
  return ListTile(
    title: Text('${_members[i]['login']}', style: _biggerFont),
  );
}

Here, you’re returning a ListTile that shows the login name parsed from the JSON for the member at index i. It also uses the text style you created before.

Replace the body line in the build method of _GHFlutterState with the following:

body: ListView.builder(
    padding: const EdgeInsets.all(16.0),
    itemCount: _members.length,
    itemBuilder: (BuildContext context, int position) {
      return _buildRow(position);
    }),

The padding adds some empty space around each list item — 16 logical pixels, in this case. Setting itemCount tells ListView how many rows it will have in total. Finally, call itemBuilder for every new row that’s visible on the screen, which you use as an opportunity to build your custom ListTile in _buildRow.

Note: Copying and pasting sometimes messes up the formatting. Fix the formatting by pressing Shift-Option-F on macOS or Shift-Alt-F on Windows. Saving the file may also automatically format, if you set up VS Code to do so.

At this point, you’ll probably need to do a full restart rather than a hot reload. The Hot Restart button is useful for that. It’s still faster than completely stopping the app and rebuilding it.

Hot Restart button

After the restart, you’ll see the following:

Showing members

That’s how easy it is to make a network call, parse the data and show the results in a list!

Wow so easy

Now, it’s time to make the list a bit prettier.

Adding Dividers

To add dividers into the list, you’ll use ListView.separated instead of ListView.builder. Replace the Scaffold’s body with the code below:

body: ListView.separated(
    itemCount: _members.length,
    itemBuilder: (BuildContext context, int position) {
      return _buildRow(position);
    },
    separatorBuilder: (context, index) {
      return const Divider();
    }),

Using ListView.separated gives you a separatorBuilder option, which allows you to add a Divider between the list tiles. Now that you have dividers, you also removed the padding from the builder.

Hot reload. Now, you’ll see dividers between the rows:

ListView with dividers

To add padding to each row, wrap ListTile with Padding inside _buildRow. The easiest way to do that in VS code is to put your cursor on ListTile and press Command-. on macOS or Control-. on Windows. Then increase the padding to 16.0, as shown in the animated GIF below.

Adding padding to ListTile

Alternatively, you can replace _buildRow with the following code to achieve the same result:

Widget _buildRow(int i) {
  return Padding(
    padding: const EdgeInsets.all(16.0),
    child: ListTile(
      title: Text('${_members[i]['login']}', style: _biggerFont),
    ),
  );
}

ListTile is now a child widget of Padding. Hot reload to see the padding appear on the rows, but not on the dividers.

Padding on ListTile

Parsing to Custom Types

In the previous section, the JSON parser took the members in the JSON response and assigned them to _members. Although you defined the list as dynamic, the actual type that Dart put in the list was Map, a data structure that holds key-value pairs. This is the equivalent of a Map in Kotlin or a Dictionary in Swift.

However, you also want to be able to use your own custom types.

Add a new Member type at the bottom of main.dart:

class Member {
  Member(this.login);
  final String login;
}

Member has a constructor that sets the login property when you create a member object.

Update the _members declaration in _GHFlutterState so that it’s a list of Member objects:

final _members = <Member>[];

You used final in place of var because, instead of reassigning a new list to _members, you’re going to add items to the existing list now.

Replace setState in _loadData with the following code:

setState(() {
  final dataList = json.decode(response.body) as List;
  for (final item in dataList) {
    final login = item['login'] as String? ?? '';
    final member = Member(login);
    _members.add(member);
  }
});

This turns each decoded map into a Member and adds it to the list of members.

Note: Curious about the single ? and double ?? question marks? Check out the Dart Basics tutorial for more details about these operators.

Flutter is still complaining inside ListTile because it was expecting Map rather than Member. Replace the title line of ListTile with the following:

title: Text('${_members[i].login}', style: _biggerFont),

You’ll see an error if you try a hot reload, so hot restart. You’ll see the same screen as before, except that it now uses your new Member class.

Downloading Images With NetworkImage

In GitHub, each member has a URL for their avatar. Your next improvement is to add that avatar to the Member class and show the avatars in the app.

Update Member to add an avatarUrl property. It should look like this now:

class Member {
  Member(this.login, this.avatarUrl);
  final String login;
  final String avatarUrl;
}

Since avatarUrl is now a required parameter, Flutter complains at you in _loadData. Replace the setState callback in _loadData with the following updated version:

setState(() {
  final dataList = json.decode(response.body) as List;
  for (final item in dataList) {
    final login = item['login'] as String? ?? '';
    final url = item['avatar_url'] as String? ?? '';
    final member = Member(login, url);
    _members.add(member);
  }
});

The code above uses the avatar_url key to look up the URL value in the map parsed from JSON, then set it to the url string, which you pass on to Member.

Now that you have access to the URL for the avatar, add it to your ListTile. Replace _buildRow with the following:

Widget _buildRow(int i) {
  return Padding(
    padding: const EdgeInsets.all(16.0),
    child: ListTile(
      title: Text('${_members[i].login}', style: _biggerFont),
      leading: CircleAvatar(
        backgroundColor: Colors.green,
        backgroundImage: NetworkImage(_members[i].avatarUrl),
      ),
    ),
  );
}

This adds a CircleAvatar to the leading edge of your ListTile. While you’re waiting for the images to download, the background of the CircleAvatar will be green.

Do a hot restart rather than a hot reload. You’ll see your member avatars in each row:

Members with avatars

Cleaning up the Code

Most of your code is now in main.dart. To make the code a little cleaner, you’ll refactor classes into their own files.

Create files named member.dart and ghflutter.dart in the lib folder. Move Member into member.dart and both _GHFlutterState and GHFlutter into ghflutter.dart.

You won’t need any import statements in member.dart, but the imports in ghflutter.dart should be:

import 'dart:convert';
import 'package:flutter/material.dart';
import 'package:http/http.dart' as http;
import 'member.dart';
import 'strings.dart' as strings;

You also need to update the imports in main.dart. Replace the entire file with the following:

import 'package:flutter/material.dart';
import 'ghflutter.dart';
import 'strings.dart' as strings;

void main() => runApp(const GHFlutterApp());

class GHFlutterApp extends StatelessWidget {
  const GHFlutterApp({Key? key}) : super(key: key);

  @override
  Widget build(BuildContext context) {
    return MaterialApp(
      title: strings.appTitle,
      // TODO: add theme here
      home: const GHFlutter(),
    );
  }
}

Save everything and rerun the app. You won’t see a change, but the code is now a little cleaner. :]

You might have noticed a new comment: // TODO: add theme here. There, you’ll make one last change before the tutorial is over.

Adding a Theme

Your final improvement is to easily add a theme to the app by adding a theme attribute to the MaterialApp you created in main.dart.

Find // TODO: add theme here and replace it with the following:

theme: ThemeData(primaryColor: Colors.green.shade800), 

Here, you’re using a shade of green as a Material Design color value for the theme.

Save and hot reload to see the new theme in action:

Running in the Android emulator

The app screenshots so far have been from the Android emulator. You can also run the final themed app in iOS Simulator:

App running on iOS Simulator

And here’s how it looks on the Chrome web browser:

App running on Chrome

Feel free to run it as a Windows, Mac or Linux app as well. It only requires a little extra setup and adding desktop support to your app. On macOS, you should also give the app permission to access the internet.

Here’s the app running on macOS:

App running on macOS

Now that’s what you call cross-platform! :]

Where to Go From Here?

Download the completed project files by clicking the Download Materials button at the top or bottom of the tutorial.

You can open the project in either VS Code or Android Studio.

Open it in VS Code by opening the root folder. You’ll need to fetch packages before running the project. Do so by pressing Command-Shift-P on MacOS or Control-Shift-P on Windows or Linux to open the command palette and running the Flutter: Get Packages command.

To open the project in Android Studio, choose Open an existing project from the Welcome to Android Studio screen and navigate to choose the root folder of the final project. Then choose Get dependencies on the 'Pub get' has not been run line in Android Studio.

There’s a lot more to learn about Flutter and Dart. Here are some places to start:

And you’ll definitely want to browse the raywenderlich.com Flutter library! There’s an ever-increasing selection of books, articles and videos to help you on your Flutter journey.

We hope you enjoyed this tutorial. If you have any questions or comments, please join the forum discussion below!