Using the Terrain Tools in Unity
Learn to create and manage a wide range of terrains in your apps by using Unity’s powerful Terrain Tools and the all new Terrain Toolbox API. By Mauro Fuentes.
Sign up/Sign in
With a free Kodeco account you can download source code, track your progress, bookmark, personalise your learner profile and more!
Create accountAlready a member of Kodeco? Sign in
Sign up/Sign in
With a free Kodeco account you can download source code, track your progress, bookmark, personalise your learner profile and more!
Create accountAlready a member of Kodeco? Sign in
Contents
Using the Terrain Tools in Unity
35 mins
- Getting Started
- Installing the Terrain Editor
- Installing the Terrain Tools Sample Asset Pack
- Understanding the Terrain Toolbox as a Toolbox
- Getting to Know the “Create New Terrain” Tab
- Creating Your First Terrain
- Looking Over Your First Terrain
- Understanding the General Section
- Introducing the Cool New Gizmo Feature
- Importing Heightmaps
- Terrain Textures
- Exploring the Terrain Settings Tab
- Terrain Utilities Tab
- Looking at the Terrain Edit Section
- Reviewing the Terrain Layers Section
- Examining the Layers
- Creating Palettes
- Adding the Palette to the Terrain
- Introducing Splatmaps
- Applying Splatmaps
- Experimenting on Your Own
- Importing and Saving Presets
- Exploring the Terrain Visualization Tab
- Revisiting the Old Terrain Component
- Create Neighbor Terrains
- Paint Terrain
- Reviewing the Brushes
- Height Brushes
- Paint Brushes
- Stamp Brushes
- Sculpting Brushes
- Erosion Brushes
- Transform Brushes
- Effect Brushes
- Introduction to Brush Masks
- Brush Mask Filters
- Combining Everything
- Painting Details and Trees
- Where to Go From Here?
Brush Mask Filters
What’s new about brushes? Well, they’re now 16-bit. Also, Unity added Filters. You’ll use a couple of them for this tutorial, but you should test them all because they’re super fun.
How would you go about painting a slope? Nah, it’s easier than that. Unity has a slope filter now.
To use it, select your terrain. Go to Terrain in the Inspector and select the Paint Terrain tool. After that, select Paint Texture in the dropdown.
Below all of the different brush textures, you should see Brush Mask Filters. Click the Plus icon and select Slope.
Notice the Eye icons on the left? They activate and deactivate filters. Your new Slope filter should already be active.
Select the Remap Curve; this is what will be interpreted as a slope. The flatter the curve, the less of a slope there needs to be for the brush to apply the texture. Select the linearly increasing line at the bottom, then right click the green line and select Add Key. Move that key to (0.95, 0.3). This should create a green line with a sudden, sharp rise towards the very end.
Select some material, like snow, and test it.

Nice, huh? Try one more. Deactivate Slope and add a Concavity filter. This will only paint surfaces that are concave or convex, depending on if you select Recessed or Exposed. Now, give it a try.

Combining Everything
You’ve made it this far. Guess what? It’s challenge time!! In Scene 6, you can apply everything you’ve learned so far. Practice everything. Try everything. Try different lighting setups to get different moods. You can also try varying camera angles. Test masks and different brushes. Experiment!
As usual, you’ll find a heightmap, a splatmap and lots of other things inside the Scene 6 folder.
When you finish, take a screenshot and post it on social media. Don’t forget to tag us! It would be awesome to see what you’re capable of.
Painting Details and Trees
As a final touch, you can add details and trees to add some flavor to the scene.
You’ll find a tree mesh in RW/Scenes/Scene 6/Tree/Tree and a detail sprite in RW/Scenes/Scene 6/Grass.
At this point, you know how to create your terrains. Remember to use both heightmaps at hand. Combine and create!
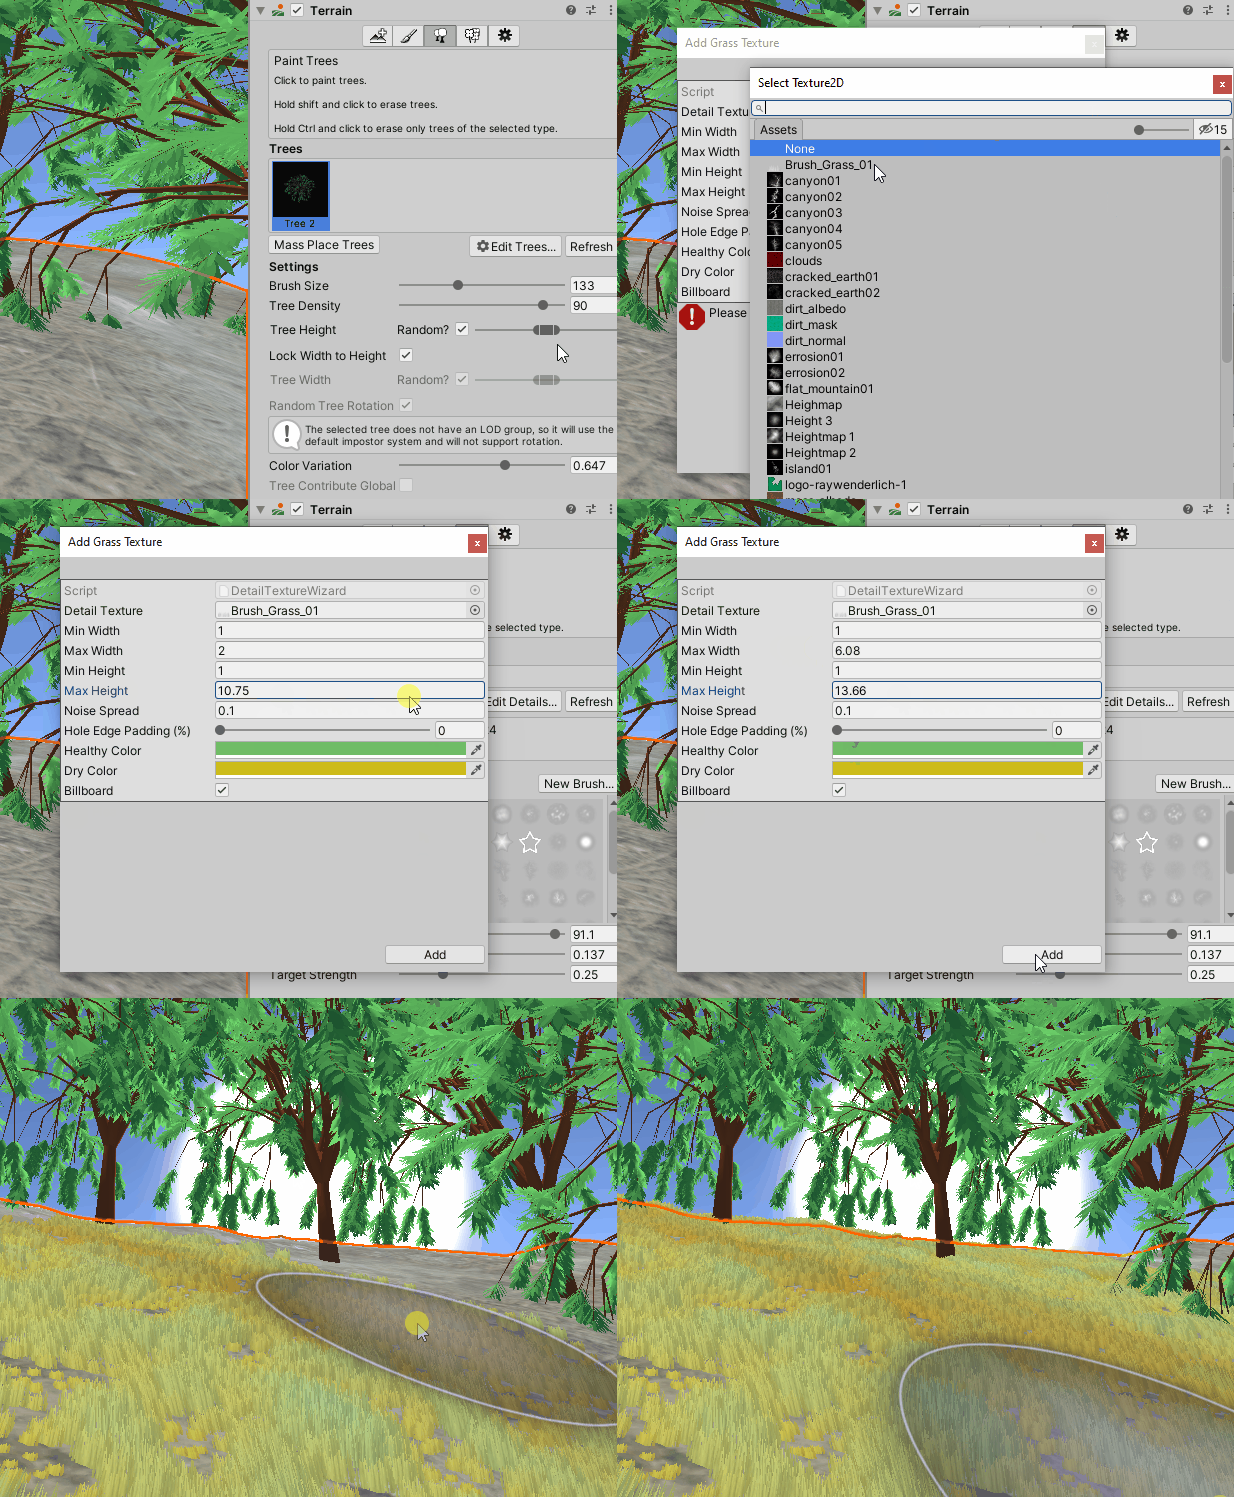
To add trees, simply select a terrain, then go to Paint Trees in the Terrain component. Select Edit Trees, then Add Tree and drag and drop the prefab Tree 2 where it says Tree Prefab. Finally, click Add.
Now, you can paint trees.

To add some details, just select a terrain and go to Paint Details in the Terrain component. Select Edit Details, then Add Grass Texture and select Brush_Grass_01. Finally, click Add.
Now, you can paint grass.

Finally, here you have two screenshots for inspiration!


Where to Go From Here?
You can download all the project files by clicking the Download Materials button at the top or bottom of the tutorial.
In this tutorial, you learned to create and manage your own terrain landscapes using the new Terrain Toolbox API from Unity.
To further detail your landscapes, you can use these assets for free from the Unity Asset Store:
For more information, see this video about the Terrain Tools from Using Terrain Tools Tutorial from the official Unity YouTube channel.
We hope you enjoyed this tutorial. If you have any questions or comments, please join the forum discussion below. Don’t forget to share your own terrains on social media and tag us!