Fastlane Tutorial for Android: Getting Started
Learn how to use fastlane to automate tasks like generating screenshots, updating metadata for your Android apps and uploading apps to the Play Store. By James Nocentini.
Setting up the Instrumentation Tests
Navigate to app/src/androidTest/java/ to find the instrumentation tests.
To create a new instrumentation test file, right-click <your package name> and select New ▸ Kotlin File/Class:

For the Name in the pop-up window, enter ScreenshotInstrumentedTest, select Class and press Enter:

Next, implement ScreenshotInstrumentedTest by adding the following to the newly created class:
import androidx.lifecycle.Lifecycle
import androidx.test.core.app.ActivityScenario
import androidx.test.espresso.Espresso
import androidx.test.espresso.action.ViewActions
import androidx.test.espresso.assertion.ViewAssertions
import androidx.test.espresso.matcher.ViewMatchers
import androidx.test.ext.junit.rules.ActivityScenarioRule
import org.junit.Rule
import org.junit.Test
import org.junit.runner.RunWith
import org.junit.runners.JUnit4
import tools.fastlane.screengrab.Screengrab
import tools.fastlane.screengrab.UiAutomatorScreenshotStrategy
import tools.fastlane.screengrab.locale.LocaleTestRule

@RunWith(JUnit4::class)
class ScreenshotInstrumentedTest {

  // JVMField needed!
  @Rule
  @JvmField
  val localeTestRule = LocaleTestRule()

  @get:Rule
  var activityRule = ActivityScenarioRule(MainActivity::class.java)

  @Test
  fun testTakeScreenshot() {
    val scenario: ActivityScenario<*> = activityRule.scenario
    scenario.moveToState(Lifecycle.State.RESUMED)
    //1
    Screengrab.setDefaultScreenshotStrategy(UiAutomatorScreenshotStrategy())

    Espresso.onView(ViewMatchers.withId(R.id.askButton))
        .check(ViewAssertions.matches(ViewMatchers.isDisplayed()))
    //2
    Screengrab.screenshot("rwmagic8ball_beforeFabClick")
    //3
    Espresso.onView(ViewMatchers.withId(R.id.askButton)).perform(ViewActions.click())
    //4
    Screengrab.screenshot("rwmagic8ball_afterFabClick")
  }
}
The code above contains a JUnit 4 test. The test function testTakeScreenshot() performs the magic. It:
- Prepares to take a screenshot of the app.
- Takes a screenshot of the first screen.
- Selects the Ask button and triggers a click on it.
- Takes another screenshot.
As with instrumentation testing on Android, installing a separate APK package installs the test APK to drive the UI automation.
Run this command:
./gradlew assembleDebug assembleAndroidTest
This assembles and tests the APK.
When the command completes, you’ll see the normal APK saved under app/build/outputs/apk/debug/app-debug.apk. Meanwhile, you’ll find the test APK under app/build/outputs/apk/androidTest/debug/app-debug-androidTest.apk.
Now that you’ve created the APKs, you’ll configure fastlane screengrab to create the screenshots automatically!
Creating Screenshots
Automating the screenshot generation process saves a lot of time. Now, you get to try it out.
As mentioned in the fastlane documentation, you’ll save the screengrab configuration in a Screengrabfile.
Run the following command in Terminal:
bundle exec fastlane screengrab init
This creates the screengrab file.
Now, replace the contents of the fastlane/Screengrabfile with the following:
# 1
android_home('$PATH')

# 2
use_adb_root(true)

# 3
app_package_name('com.raywenderlich.android.rwmagic8ball')

# 4
app_apk_path('app/build/outputs/apk/debug/app-debug.apk')
tests_apk_path('app/build/outputs/apk/androidTest/debug/app-debug-androidTest.apk')

# 5
locales(['en-US', 'fr-FR', 'it-IT'])

# 6
clear_previous_screenshots(true)
Here’s what’s happening:
- android_home: Sets the path to the Android SDK that has the command line tools.
-
use_adb_root: Starts
adbin root mode, giving you elevated permissions to writing to the device. - app_package_name: Sets the unique package name of your app.
- app_apk_path and tests_apk_path: The file path to the app APK and test APK files, which you created in the previous section.
- locales: Designates the areas where you want to create screenshots. Here, it creates screenshots for English, French and Italian locales.
-
clear_previous_screenshots: If set to
true, this clears all previously-generated screenshots in your local output directory before creating new ones.
Testing in an Emulator or Device
To test, you need to start an emulator or device.
However, if you run a device or emulator with API 23 or below, either option will work. See comment #15788 under fastlane issues for more information.
adb needs to run as root. That’s only possible with the Google APIs target.
However, if you run a device or emulator with API 23 or below, either option will work. See comment #15788 under fastlane issues for more information.
To check an existing emulator’s target, open AVD Manager and read the Target column:

Next, you need to make sure you have adb and aapt in your path. There are many ways of setting up the path; these differ based on the OS you use. To set it up in your current terminal session, execute the code below, being sure to use the correct path, according to your Android SDK setup:
# Path to Android SDK
export ANDROID_HOME=$HOME/Library/Android/sdk

# Path to Android platform tools (adb, fastboot, etc)
export ANDROID_PLATFORM_TOOLS="$ANDROID_HOME/platform-tools"

# Path to Android tools (aapt, apksigner, zipalign, etc)
export ANDROID_TOOLS="$ANDROID_HOME/build-tools/29.0.3/"

# Add all to the path
export PATH="$PATH:$ANDROID_PLATFORM_TOOLS:$ANDROID_TOOLS"
Here, you’re making sure all tools under the Android SDK are available in the path.
Notice ANDROID_TOOLS references the build-tools folder for version 29.0.3. Make sure to specify the version you have.
After the emulator or device starts, run this command in the project’s root folder:
bundle exec fastlane screengrab
If you have multiple devices connected, you can specify which one to use by first running adb devices and then using the identifier in the screengrab command:
bundle exec fastlane screengrab --specific_device emulator-5554
This starts the screenshot-grabbing process. Right now, it will throw errors; just ignore them. Eventually, it will complete and your default browser will open a new tab to display the screenshots for each locale.
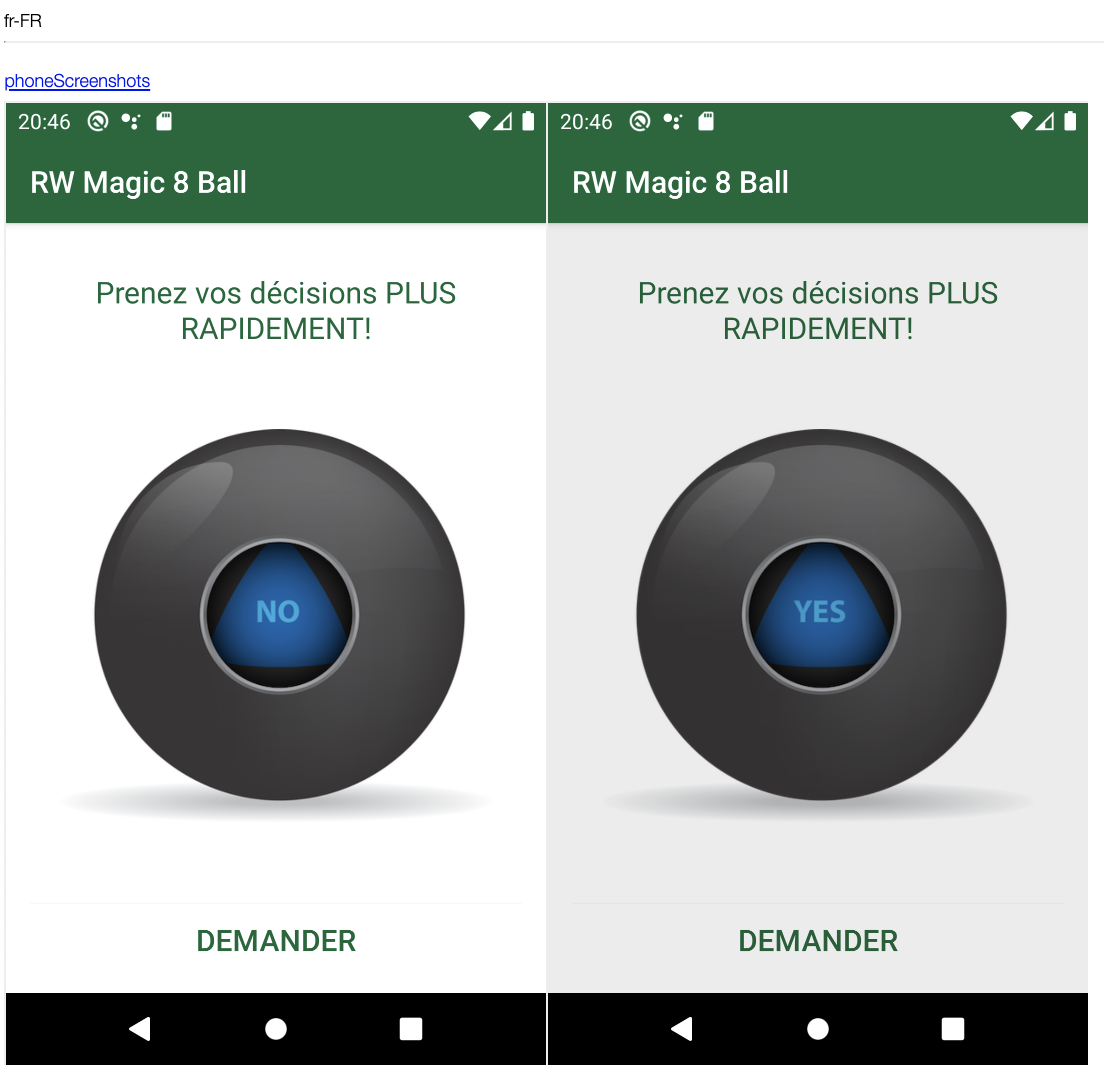
Congratulations! You’ve created screenshots for RWMagic8Ball with fastlane for the Play Store!
But before you proceed to the next topic, there’s one more step to finish: Creating a lane to group multiple commands into one.
Adding a Lane
Open Fastfile and add the build_for_screengrab lane below the build lane:
desc "Build debug and test APK for screenshots"
lane :build_for_screengrab do
  gradle(
    task: 'clean'
  )
  gradle(
    task: 'assemble',
    build_type: 'Debug'
  )
  gradle(
    task: 'assemble',
    build_type: 'AndroidTest'
  )
end
From now on, you can create new screenshots with below commands:
bundle exec fastlane build_for_screengrab && bundle exec fastlane screengrab
Perfect. Now, it’s time to distribute your app!
Automating App Distribution
The beauty of fastlane is you can easily switch to different beta providers or even upload to multiple providers at once, with minimal configuration.
In the following sections, you’ll configure fastlane with two app distribution providers:
- Beta Testing: Once you have a new feature ready, you’ll want to share it with beta testers to gather feedback before releasing it on the Play Store. To do that, you’ll use the Firebase App Distribution service.
- Play Store: Fastlane provides the upload_to_play_store action to upload metadata, screenshots and binaries to the Play Store.
To upload a build to Google Play, use the fastlane supply action.
Google Play provides different release tracks, which come in handy when you want to send a build to a selected set of early testers.
The available tracks are: open, closed and internal test. More information is available from the Play Console Help docs.
The default value of the fastlane track parameter is production.