Fastlane Tutorial for Android: Getting Started
Learn how to use fastlane to automate tasks like generating screenshots, updating metadata for your Android apps and uploading apps to the Play Store. By James Nocentini.
Using Firebase CLI
Your next step is distributing builds to testers with Firebase App Distribution. Although the Play Store provides similar functionality through the internal and beta tracks, you’ll see Firebase App Distribution provides a better user management experience when you upload a new version of your app.
To use Firebase App Distribution, first create a Firebase project.
Visit the Firebase website. You’ll see something like this:

To get started, click the Go to Console button on the upper-right side of the screen. You might need to sign in with Google.
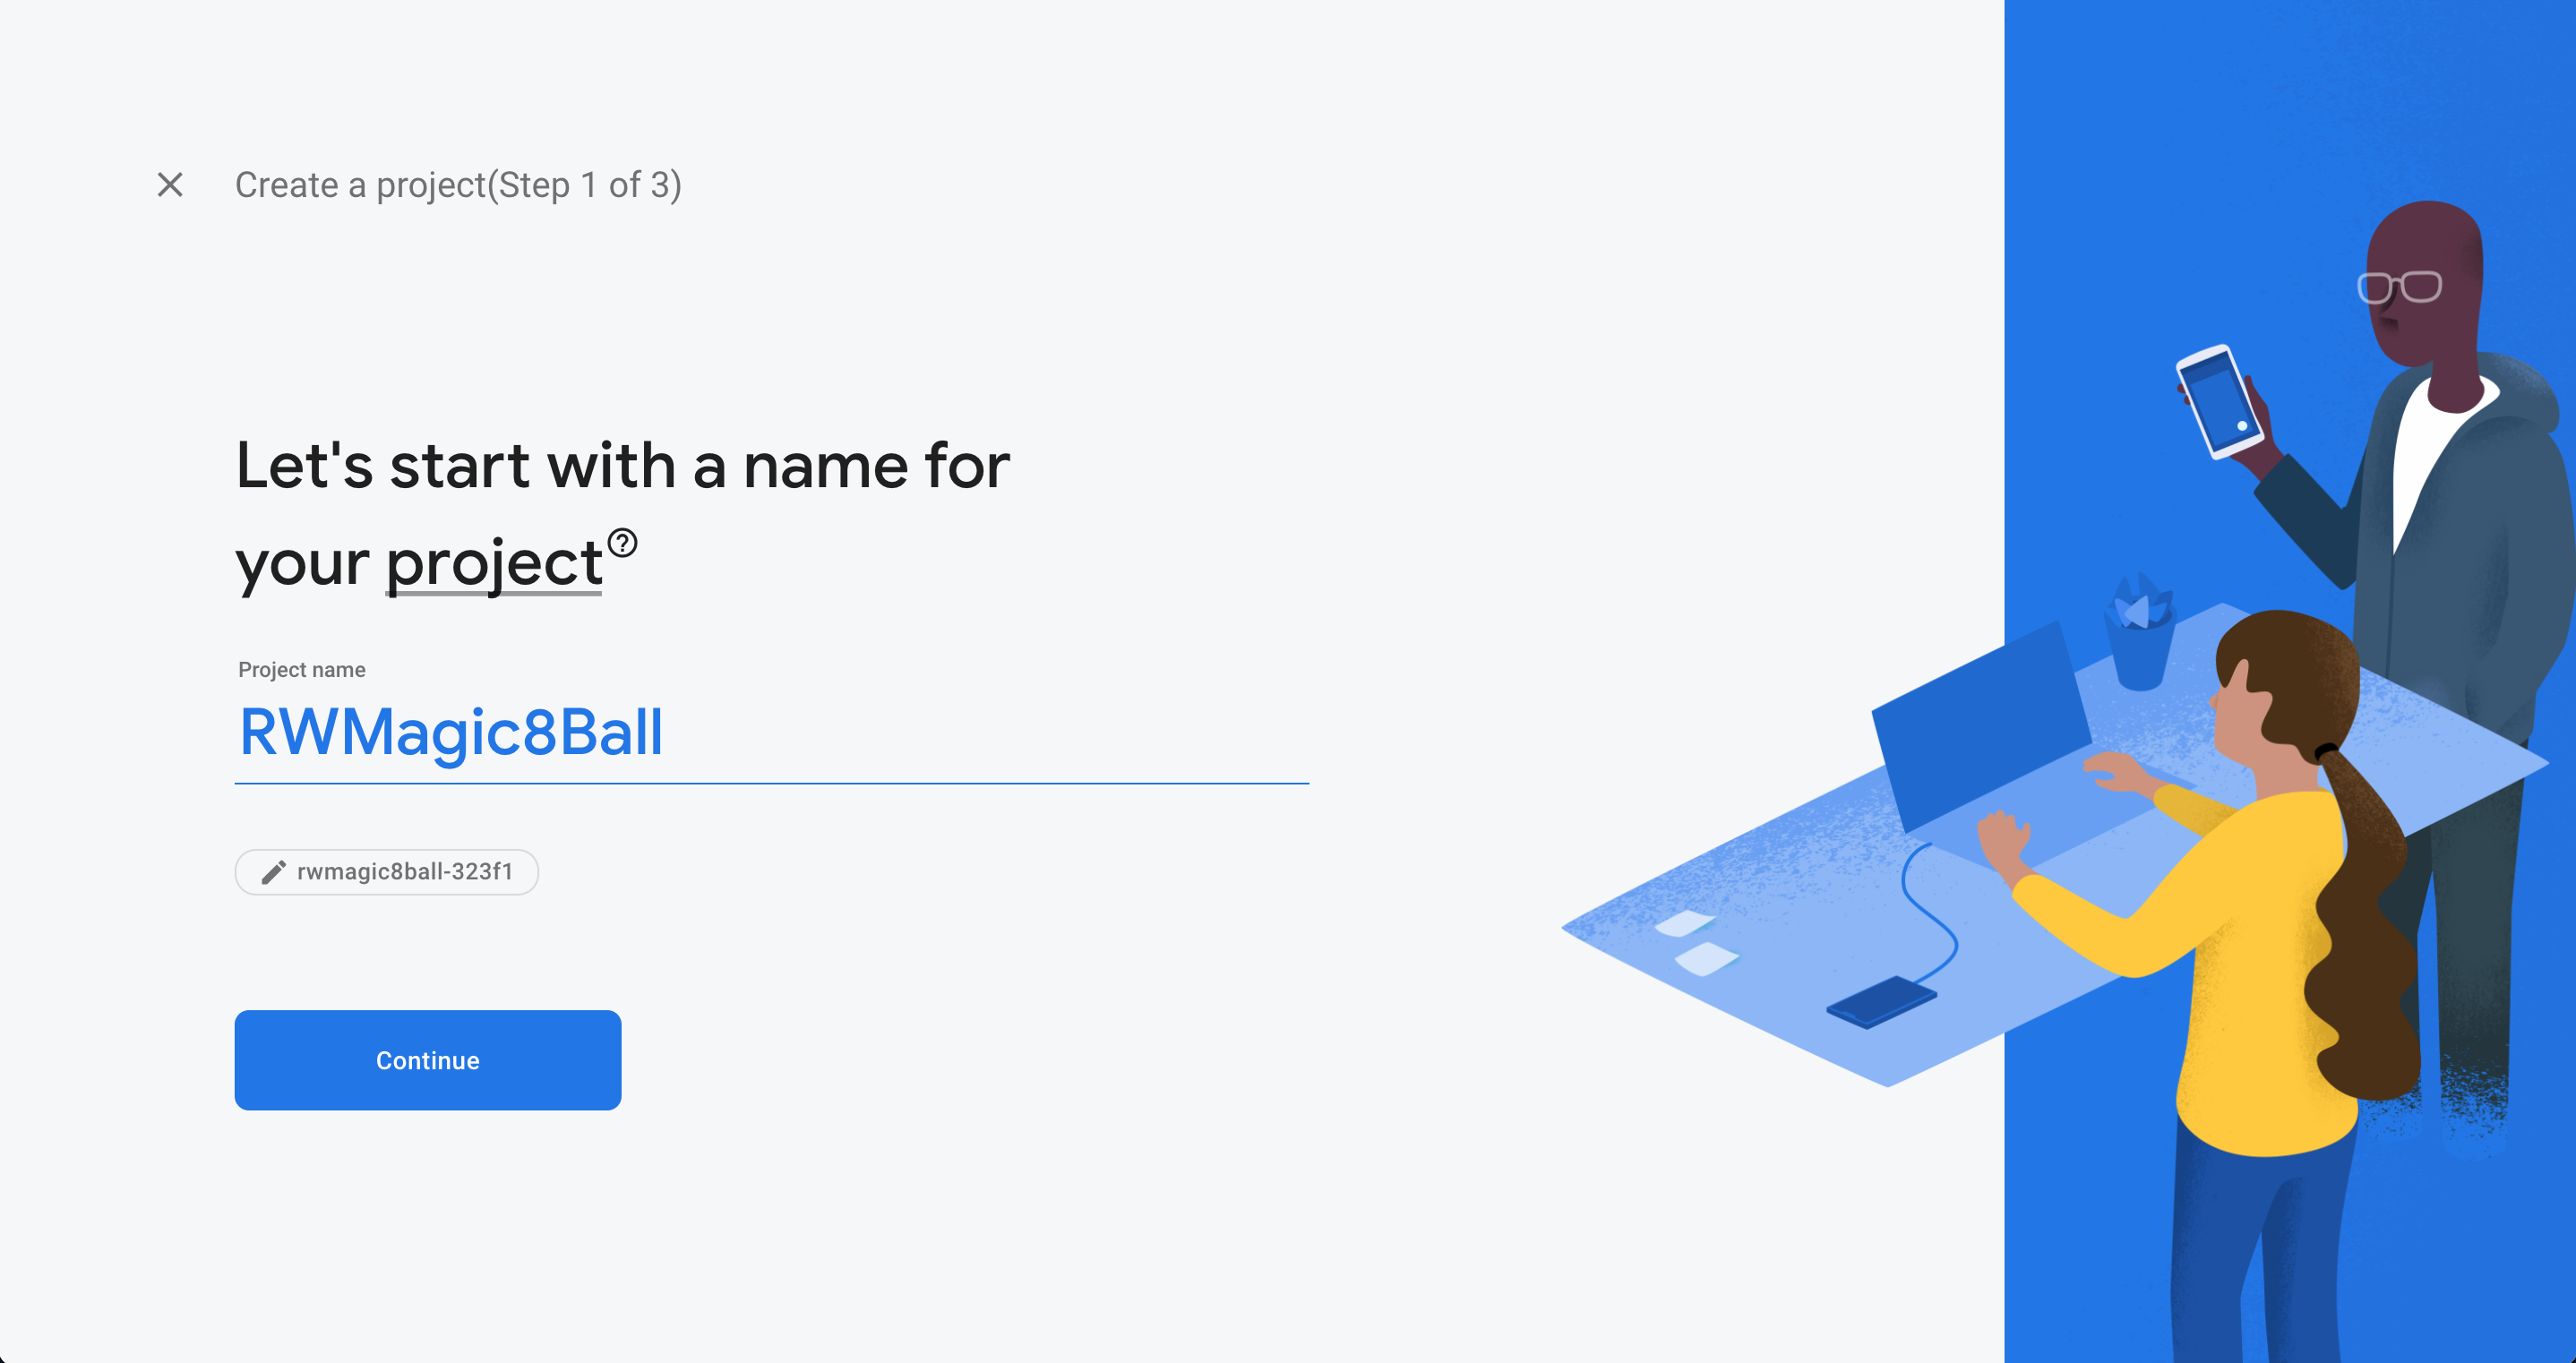
Create a new Firebase project by clicking Add project:

For this tutorial, use RWMagic8Ball for the project name. Your setup will look like this:
Read and accept the terms, if needed, and click Create Project. You’ll see a message that your new project is ready.
Click Continue to view the project dashboard.
When fastlane uploads a build to Firebase App Distribution, it uses the Firebase CLI to connect with the Firebase servers. Install or update to the latest version of Firebase CLI for your OS.
After the installation completes, run this command to sign in to your Firebase account:
firebase login
Installing the fastlane Plugin
You’re now ready to configure fastlane with Firebase App Distribution.
Run the following command:
bundle exec fastlane add_plugin firebase_app_distribution
This installs the firebase plugin for fastlane.
You’ll see a prompt like this:
[07:49:07]: Plugin 'fastlane-plugin-firebase_app_distribution' was added to './fastlane/Pluginfile'
[07:49:07]: It looks like fastlane plugins are not yet set up for this project.
[07:49:07]: fastlane will modify your existing Gemfile at path '/Users/jamesnocentini/Documents/project/rw/rwmagic8ball/RWMagic8Ball-final/Gemfile'
[07:49:07]: This change is necessary for fastlane plugins to work
[07:49:07]: Should fastlane modify the Gemfile at path
'/Users/jamesnocentini/Documents/project/rw/rwmagic8ball/RWMagic8Ball-final/Gemfile' for you? (y/n)
Press y to continue and install the plugin.
Open the Firebase console to add the Android app to your project. Select your project and click Add Firebase to your Android app.

Enter your package name and click Register app. SHA key can be empty for now; you only need it when signing an APK.

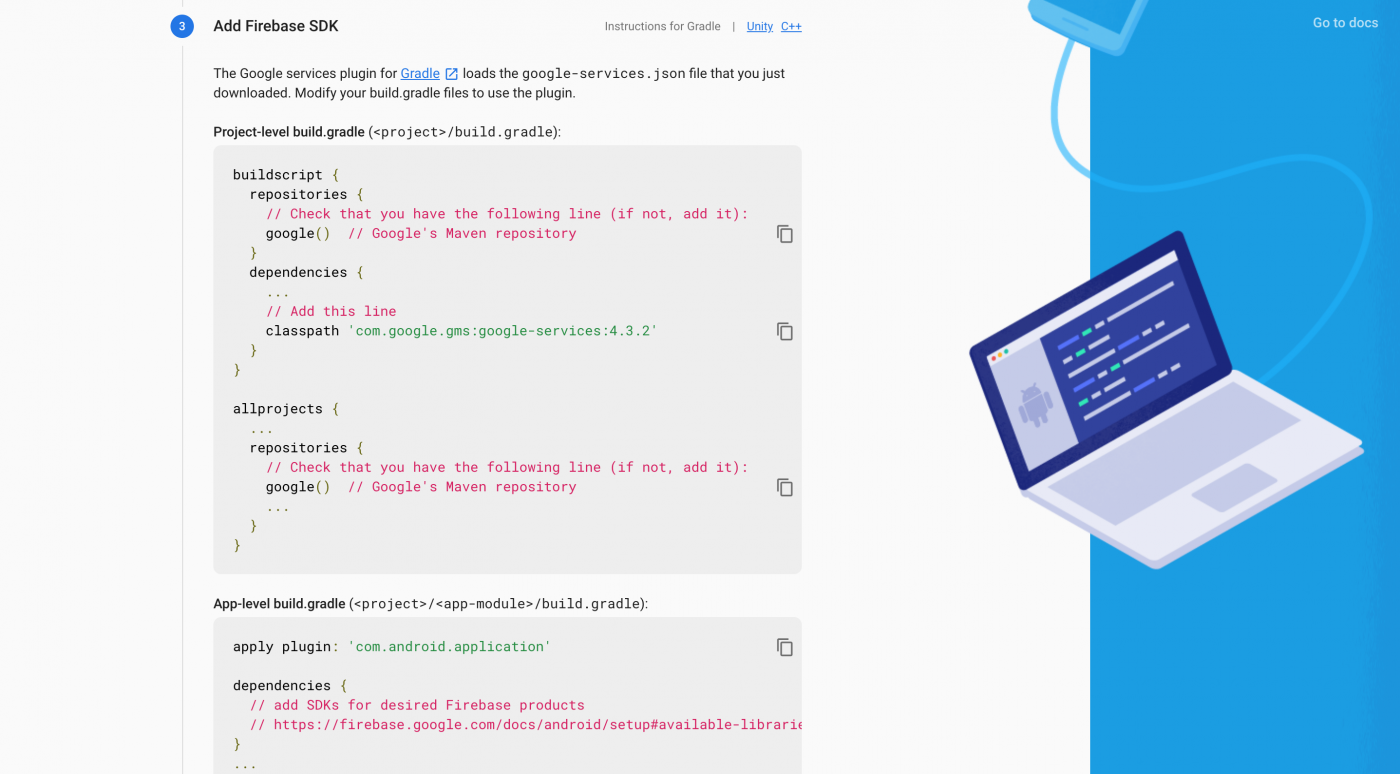
Follow the instructions to add google-services.json to your project, then click Next.

Follow the instructions to add the Firebase SDK to your project and click Next.
Once installed, open the General Settings page for the project. Scroll down to the Your apps section. Write down the App ID — you’ll need it to configure fastlane later.

Now, you’re ready to use Firebase to send different builds of your app to different groups of testers.
Testing Groups
Firebase App Distribution lets you create groups with different users and specify which group should receive each build release.
To implement this, navigate to the App Distribution tab:

Go to the Testers and Groups tab and click Add group. Name the first group: Group one.
Next, click Add group again and add a second group named Group two.
Finally, click Add testers and enter your email address to add yourself as a tester in Group two.

You’re now ready to upload your first build with fastlane.
Deploying for Beta Testing
Open Fastfile and replace the beta lane with the following, making sure to replace app with the App ID you copied previously:
desc "Submit a new Beta Build to Firebase App Distribution"
lane :beta do
  build

  firebase_app_distribution(
      app: "1:123456789:android:abcd1234",
      groups: "group-two",
      release_notes: "Lots of amazing new features to test out!"
  )
end
The code above sets up the beta lane for the group-two test group. You can read more about the available parameters in the firebase_app_distribution action in the Firebase documentation.
Run the beta lane:
bundle exec fastlane beta
When the upload completes, you’ll see the following command output:
[08:28:48]: ---------------------------------------
[08:28:48]: --- Step: firebase_app_distribution ---
[08:28:48]: ---------------------------------------
[08:28:51]: ▸ i  getting app details...
[08:28:54]: ▸ i  uploading distribution...
[08:29:29]: ▸ ✔  uploaded distribution successfully!
[08:29:29]: ▸ i  adding release notes...
[08:29:30]: ▸ ✔  added release notes successfully
[08:29:30]: ▸ ⚠  no testers or groups specified, skipping

+------+------------------------------+-------------+
|                 fastlane summary                  |
+------+------------------------------+-------------+
| Step | Action                       | Time (in s) |
+------+------------------------------+-------------+
| 1    | default_platform             | 0           |
| 2    | Switch to android build lane | 0           |
| 3    | gradle                       | 53          |
| 4    | firebase_app_distribution    | 42          |
+------+------------------------------+-------------+

[08:29:31]: fastlane.tools finished successfully 🎉
The build is now visible on the Firebase App Distribution tab.

Users in Group two will receive instructions by email to install the app, as shown below:

Congratulations! You used Firebase App Distribution for beta testing.
In the next section, you’ll learn how to do the same with the Google Play Console.
Creating Play Console Credentials
You can read more about associating an account and the registration fee on the Google Play Console website.
You can read more about associating an account and the registration fee on the Google Play Console website.
To connect it with the Play Store, you need to configure it with the appropriate credentials. To do this, you’ll need an API key file. This JSON file contains the credential data fastlane uses to connect to your Play Store account.
To get one for your Play Store account, follow these steps from the fastlane documentation.
After you complete those steps, you’ll see the newly created API access JSON file.
Run the following command to test the connection to the Play Console API:
bundle exec fastlane run validate_play_store_json_key json_key:/path/to/your/downloaded/file.json
You’ll see the following output:
[07:53:45]: Successfully established connection to Google Play Store.
To use the key in this project, specify the path to that credential file in the Appfile, which you generated earlier in the tutorial.
Rename the private key file to api-play-store-key.json. Move it to the root directory of the project. Then, update fastlane/Appfile with the following line:
json_key_file("./api-play-store-key.json")
Done! Your next step is to upload it to the Play Console.
Uploading to Play Console
If you try to upload a build to the Play Store using the deploy command at this stage, it fails. Give it a try:
bundle exec fastlane deploy
You’ll see the output:
[07:56:56]: Google Api Error: Invalid request - Package not found: com.raywenderlich.android.rwmagic8ball.
This message means an app with that package name doesn’t exist on the Play Store Console yet.
fastlane cannot create a new listing on the Play Store. Creating an app listing includes uploading the APK to one of the available tracks so the Play Console knows your app’s package name. You don’t need to publish the APK.
In the next section, you’ll create the app on the Play Store Console website.